


Painting your kit with camouflage patterns is one of those weird things that's not quite for beginners but is incredibly easy and satisfying to do. Getting camo to come out just right needs only a bit of extra materials and some patience,
Before you begin to contemplate camo designs, you should at least be comfortable painting your kits with an airbrush. While it's possible to hand paint or use spray cans, there are some issues that arise. Spray cans typically leave a thicker coat of paint than airbrushes. Normally this isn't a problem over entire parts where, after assembly, you can't tell where the paint begins and ends. Camo typically involves masking hard edges of overlapping colours and these edges can become unsightly with thick paint coats. While I've never tried hand painting when camo has been masked out, I would be concerned with the potential for moisture to seep into the edges.
Planning
Before you get to masking and painting it's a good idea to plan your design and colour scheme. There are a ton of different ways to do camouflage from subtle to bold, from free form to hard lines, even from authentic to original.
I personally prefer like colours that are pretty similar in shade or tone, overlapped to provide a bit of complexity. Take my Semovente or AGE-1 Titan for example. Like colours also allow you to use lighter coats and avoid edges between masks. The key is to figure out what colour you want a little of and what you want a lot of. The more you mask the more of that colour sticks around as you apply additional layers.
If you're looking for realism hit up Google and see what's out there. Many nations have had/use specific colours and patterns for their military units. Wikipedia has a large list of patterns and what organizations use them.
What's great about Gunpla is that you can do whatever you like without having to worry about authenticity or realism. Don't be afraid to be creative!
Masking Camouflage Patterns
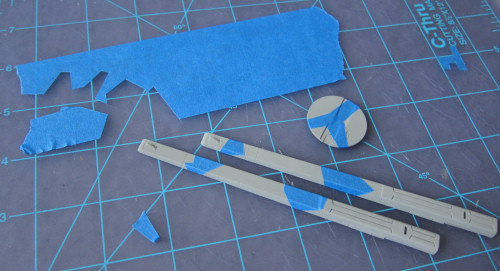
There are two main ways to mask for camo, with masking tapes and/or poster putty. Tapes provide the ability to easily cover areas large and small with straight edges. Putty allows for more free form shapes, but since most people don't have a ton of putty laying around, putty doesn't work as well for large areas.
Using masking tape is the easiest and most effective way to create cool camouflage patterns. If you like dot matrix/digital camo patterns, I suggest getting yourself some pre-cut masking sheets from HIQ Parts. It's essentially the same tape material Tamiya uses for their masking tape but a large sheet with various patterns cut into it. According to Hobby Link Japan, some styles/sizes may be discontinued but they're still listed on other sites (though they may not be in stock).
Do it yourselfers can get the same look by cutting up smaller strips of regular Tamiya masking tape into pleasing designs. If you want to go a bit more abstract with your patterns you can cut up larger pieces with some painter's masking tape, a cutting mat, and a hobby knife. Start by placing a piece of tape on the mat, cut your desired shape, then simply remove and apply to your model. It's incredibly cheap and easy. Whatever you do though, make sure to get the modern type of painter's masking tape. The old style (typically beige in colour) has issues, namely a tendency for paint to seep in along the edges. Definitely a no-no for modeling. Be aware that masking tape has the potential to pull away from the kits around the edges or rough surfaces and this can be exacerbated by moisture from the paint. Before applying any coats make sure that everything is still in place properly.
I've also seen people print out camo patterns either onto large sticker sheets or onto paper which they've placed above masking tape. Either way, after a bit of hobby knife work, you've got your own camo stickers to use. Frankly most of the pattern sheets I've seen out there are pretty awful with some funky shapes, but as I mentioned above, it's all in the eye of the beholder!
Poster putty is generally used to hold up posters when someone doesn't want affix them with tacks or pins (hence the name) and can be picked up at most office or hobby supply shops. It's ease of use, reusability, and safe use of paint makes it handy tool for modelers. If you've read through the rest of the Layman's Gunpla Guide you've probably seen me use it for masking thrusters or holding pieces on toothpicks for paint. Simply knead some up and lay it across your piece making sure it sticks and that you've got a nice clean edge.
If you want to do free form shapes over large areas you can mix tape and putty. Simply use your putty along the edges of the shape you like then fill the remaining area with masking tape. If you know what shape you want prior to applying putty I recommend putting down tape first, roughly matching the area you want, then apply the putty along the edges.
The Basic Steps
- Paint the base coat - This the colour that you're going to see the least of once everything is done. Think of it as your highlight or accent colour. Allow to fully dry.
- Apply the Mask - Apply the masking tape or putty to the pieces. Apply more or less depending on how much of that colour you want to save for later. Complex designs will use a lot, subtle designs less. If using pre-cut pieces make sure to spread out certain shapes to keep things from being too uniform.
- Repeat steps 1 & 2 as desired - Continue by applying your second/third/etc colours of paint with more masking in between. Try to apply as few coats as possible otherwise you'll notice the stacked layers after removing the masking.
- Apply the final coat - This is the main colour of the kit, and depending on how much masking you applied, the dominate one.
- Carefully remove the masking - Once the final layer is dry it's time to remove all the layers of masking. Where possible start by slowly removing the top layer and working your way down. If pieces are stuck together and pull up lower levels that's not an issue. Quality tapes will come off previous layers of paint cleanly. To get under the tape and peel it away you can use a hobby knife at a close angle or a good pair of tweezers. Either way, move slowly and deliberately or you might scratch the paint. If you do, no worries, it can be touched up with dab of paint later.

And you're done! Wasn't that easy? Now you can proceed as usual with dealing and top coats.
Hand Painting Camo
If you're really good with an airbrush, which I am not, you can just draw on free form shapes manually. Instead of having a clean line it'll give you a fuzzy or blended look depending on how you apply it.
I've also seen modelers use a brush to hand paint white details or dark outlines which is often seen on desert camouflage patterns.


