Build Review
As is tradition, I’m going to open up with a lengthy recap of this build. I always figure some folks out there will benefit from knowing my trials and tribulations as they work through their own builds. If you’re not interested skip on down to the pretty pictures at the end of his article. If you like this build please check out my last PG Unicorn, which I built and painted in a single week, or my last painted kit, the 1/100 Elyn Hobby Kshatriya.
Paints
The first thing you’re probably looking to ask, “What’s that sexy purple?” Well it’s Mr. Crystal Colour’s Amethyst Purple (XC04). For the most part it’s straight on top of the gray frame, but in various areas it’s properly painted over gloss black. More on that later. The rest of the colours used on the kit include…
- Tamiya XF-63 – German Gray
- Tamiya XF-69 – NATO Black
- Tamiya XF-53 – Dark Sea Gray
- Krylon Primer (When you want that perfect middle of the road gray)
- Tamiya XF-18 – Medium Blue
- Tamiya X-31 – Titan Gold
- Tamiya X-12 – Gold Leaf
- Tamiya XF-6 – Copper
- Tamiya XF-50 – Field Blue
- Model Master Chrome
- Model Master Napoleonic Violet
So Many Flaws
What’s that saying, “a death by a thousand cuts”? Well that’s how I feel about this kit. Everywhere I look I see something that’s not 100% perfect. Paint that didn’t come out as smoothly as I would’ve liked. A scratch here and there. Decals that have silvering. A piece that doesn’t fully fit because of the painted frame. A splotch or two resulting from some sort of weird reaction between the top coats and the decal solution. Etc.
Yuck.
For starters, those few splotches. I don’t know what the fuck happened. The ones on the kit that you can see (predominately on top of the rifle) showed up after a final top coat. Not sure how they got there but my best guess is that there were minerals in the water used to apply the decals. A drop here and there that dried and left the minerals behind, only for the minerals to be exposed during the final matte coat. Going forward I used distilled water when applying the details which helped for the most part. On the main part of the shield, after decals and decal solvent, I had this white splotch that showed up. It looked horrible. I couldn’t rub it away and thought something fucked up between the decal solvent and the Future I laid down beforehand. To make things worse, when I tried rubbing it away I scratched the paint. So, I thought, let’s just spray a bit of paint on top and cover the whole thing up. Gotta protect those decals, so a quick coat of clear before I mask the area. What do you know, with the top coat the white splotch went away. What the fuck. Of course, since I previously scratched the paint, I still had to apply a quick touch up. And, as I should’ve foreseen, because there’s a couple layers of top coat difference between the two areas, there’s a subtle tone difference.
The decals ended up being another pain. The gold ones you see are after market ones I got from Samuel Decal (I don’t believe he printed these, just got them from someone else). They certainly look great, a perfect gold. Unfortunately they’re thicker than most decals and decal solvents didn’t really do much to bind them to the paint. Thus, quite a few silvered behind the clear pieces. To help minimize the issue on the shield I cut out the clear areas around the “02” to a fair bit of success. Still managed to miss an area or two though.
An important thing to note, if you haven’t heard me say this before, is that parts of the PG Unicorn frame are very very tight. Normally not a problem, but hot damn does it suck when you’ve painted every nook and cranny. It’s the one kit that I know I need to pull out a hammer for (pro-tip, don’t actually hit the kit with the hammer directly, use cloth or some other non-abrasive padding to deaden the blow a bit). As smooth and sexy as the purple frame looks, the Mr. Crystal Colour coating is rather sandpaper like. Things are tighter on this kit than on my previous build where I used straight matte primer for the frame. I’m going to use the green version for my PG Final Battle Unicorn and will have to remember to sand out some of the connection points first.
I also completely fucked up while messing around with the base, but let’s not talk about that.
On The Bright Side
I suppose it’s not all doom and gloom. I like trying out new things and my first foray into Mr. Crystal Colours was pretty successful. I also got to do a colour scheme I’ve been wanting to try on a Banshee kit for ages. Maybe testing both these things on a Perfect Grade kit wasn’t the best idea, but despite the flaws it does look pretty stunning.
The gold decals, despite my issues with them, really complement the kit nicely. As does the two-colour details used on the external armor. Did the same on my previous kit and, as far as I’ve seen, I’m the only person to do this type of thing on a PG Unicorn.
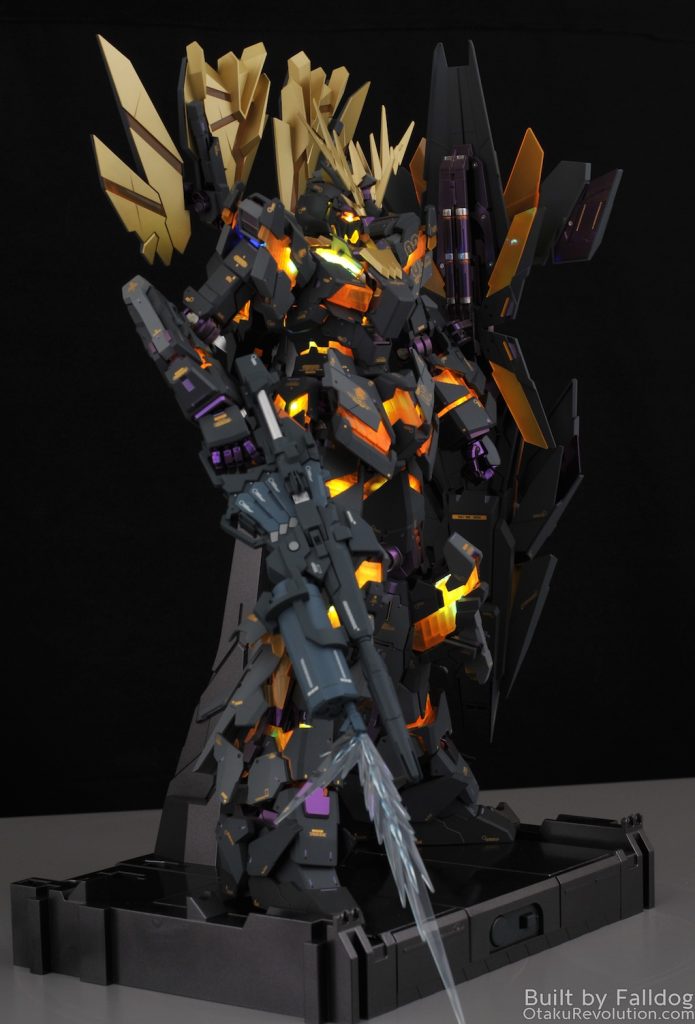
The Bandai LED set for the PG Unicorn line features white wires between the various components. Generally they’re not noticeable, but there are a few areas where they’re partially visible. Since I didn’t use white anywhere I didn’t want those little bits of visible wire to be jarring, so I coloured them red with a Sharpie. This carries the red from the eyes, which I also used on the inside of the thrusters (which are technically a red to gold fade, but it’s hard to tell in photos). Note that using a Sharpie for the cables worked really well, but can rub off on your fingers when trying to fit the cable through some of the tight management notches.
Bright Light Picture Show
Now the moment, I presume, you’ve all been waiting for.


![]()