

After about two months I have completed my PG Exia build with mini hanger diorama and detached GN drive!

One of these days I really need to go back and re-read all of my post-build mission reports. I have a sneaking suspicion that with all of my big builds I complain and say how terribly I screwed up the build. This is another one of those examples. For everything that went well, at least one other aspect didn't quite go as planned for got messed up along the way.
Before I start commiserating about my build I want to take a minute to talk about the PG Exia. Without a doubt, it is easily a top tier Perfect Grade from Bandai. As someone who's build a metric shitload of Perfect Grade Unicorns I feel like Bandai listened to all most of the criticism from that release. The LED wiring is a thousand times simpler this time around. Instead of building out a section of the kit and carefully feeding wires through tight joints you actually build the kit around the wires as you go along. The risk of breaking a cable along the way is greatly reduced. There's also a lot more detail on the inner frame than previous kits. Okay, not a lot like you'd find on the MKII, but considerably more than the 00 Raiser & Unicorn, and completely in line with what you'd expect from a 00 era kit. Most impressively to me, Bandai addressed one of my biggest issues - the lack of fexability on the stand. With the PG Unicorn the torso was locked in an upright position, really limiting the posability of the kit. The connection point on Exia's base actually adjusts forward and back for a much greater range when making dynamic poses (of course I end up leaving it in the default position for my build - shame on me). Unfortunately there's no side-to-side action but I'll take what I can get. I still want to say the detail and flexability of the PG Strike is makes it #1, but the PG Exia is right on its heels.

Now for the build itself... When I started the build I wanted to do something a bit differently and display the GN drive along side the kit. That way, once I find a place for it in my display, I can just hit the power button and enjoy the gimmick without having to pull it out and look at the back. To that end I went and got a cart (more on that later) and proceeded to make plans, and cuts, and even glue things to that end. Unfortunately, after finishing the inner frame, I found out that without the GN drive inserted the rest of the kit won't light up. I tried, unsuccessfully, to get around the issue by splicing connections on the torso connector. Despite my best attempts I could only get half the kit to light up properly with the other half only lighting some of the LEDs. This left with me with a dilemma, either scrap my plan or risk getting another Exia Lightning to see whether a second GN drive module could be connected at the same time. A pricey gamble. Very conveniently a member of r/Gunpla was selling their Lightning kit at a discount because they messed up another part of the wiring harness. I took a chance, picked it up, and thankfully the wiring works great with two GN drive modules inserted. Of course now I have a second PG Exia Lightning sans complete LED to part with, but that's another issue.
With a bunch of LEDs now hidden behind a plug in the back a new idea arose, fiber optics between the plug and the GN drive itself. With some side glow cables in hand I drilled some holes and used some hollow pla-plate tubes to make mounting points. To mount to the GN drive unit I drilled some plaplate to match and taped it to the unit directly. That allowed me to hot glue the fiber optics directly to the unit without having to worry about messing something up. This also allowed me to get a snug fit between the cable and the LED for maximum effect. Interestingly enough there are multiple colour LEDs in the back for the Trans-Am effect mode, so with a bit of shifting I could make them light up with blues, purples, reds, etc. However this would've meant a bad seat for the green LEDs, so Trans-Am mode is more of a nondescript white as Bandai intended.
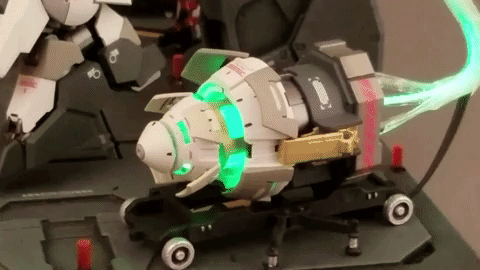
The rotation of LEDs in the drive translates to the fiber optics nicely.
While I'm talking LED bits, I also added some to the base. Lots of people have taken those Kotobukiya hangers and added LEDs but it always looks way over the top and too bright to me. I wanted to add some LEDs to the base of the kit, where there are already a bunch of conveniently shaped holes, but not have them be too dramatic. Because I can't wire LEDs for shit I bought a pre-lit string off of Amazon and used some cut up runners (which looked a lot more red before they were glued into place). Not overly pleased with the result. The brightness isn't consistent and I think they could've been cut down further or raised higher with more details.


Before and after the gunk wash
The rest of the base turned out well. Just enough colour separation and detail for a simple look that doesn't draw the focus away dramatically. Preshaded details with a gunk coat give it a really worn and greasy feel. On a side note I accidentally cut through one of the painted yellow bits when cleaning out room for the LEDs down below, then painstakingly repaired, only to now realize that the setback/repair would've been moot with a weathered state. The rear of the stand features a pla-plate tube to hold the fiber optics and some additional silver/red spring details (of course while putting in the fiber optics I didn't notice that one of the springs moved before my photo shoot grrrrr).
The rest of the kit is clean, factory new. Various shades of gray and off white on top of a frame that's a simple gunmetal with gold and a few silver accents. I think the gold turned out really well despite it not being my favorite shade (Tamiya X-12 Gold Leaf). There are a ton of colour separation paths available with this kit and I tried to keep things relatively balanced and not overdone. Decals are from one of numerous PG Unicorn sheets I have laying around.
I didn't do any detailing on the frame of the Exia, felt like adding lines and colouring would make parts of it too busy. I did a two tone shade on the blade, the center part is a bit darker than the main edge, but it's really, really subtle. In retrospect I should've gone a bit more darker but while removing the masking tape the blade cracked every so slightly and I didn't want to risk further damage by repeating the process.
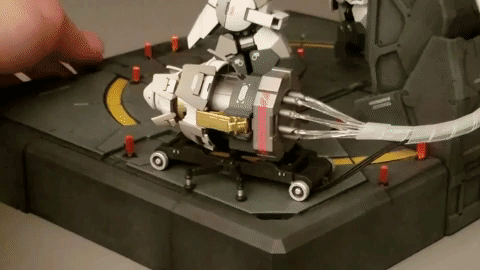
The cart the GN drive sits on, and the racks for the arm armor & hilts, were picked up via Shapeways and modified where necessary. Sadly there's not an abundance of 1/60 scale hanger equipment out there. The pieces on the cars are strapped in using SIG Super Stripe which is still a lot more suck than anything else. Getting them in place while hiding the seams was a PITA and they're not as tight as I would've liked visually. I also went the extra step to paint the back of the armor pieces gun metal for a realistic look.
Okay, I think at this point I've run out of things to say about this kit. There's always a bit more I could complain about but let's just leave it as is for now. Photo time!


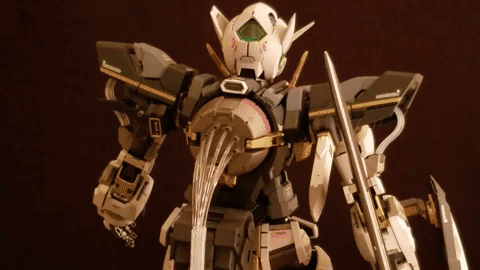
What the GN drive looks like in its proper place


A proper view of the base


