
Bandai’s 1/100 Master Grade Sinanju was my first build of 2009*.
(I haven’t proofed this article, so suck it)
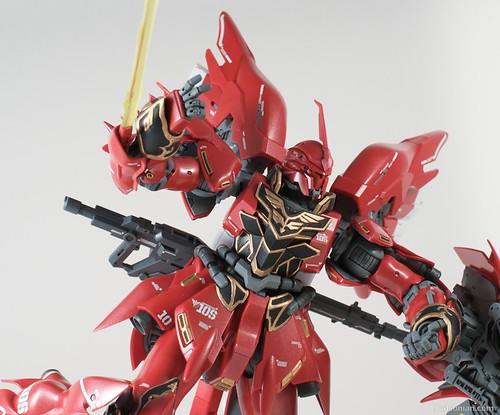
From a build quality this kid if fucking fantastic. Not only does it look great, but it’s a big sucker, considerably taller than most MG Gundams. Much to my surprise this kit lacks pollycap joints. While I hated that on my Crossbone the mechanics here are great. The joints are innovative and make for lots of movement. The only issue here is that the shield can be a bit heavy (at least with the beam saber things attached) than the arm can support. If it’s clipped on the forearm it has a tendency to pop off all to easily or slowly cause the arm to dip down.
This was one of the most frustrating models I’ve worked on. Not so much on part of the actual design or build quality but due to my own inexperience.
This was the first kit I’ve worked on that required a lot of detail trim. Different than regular lining procedures the trim on this kit is slightly raised up above every other bit. Out of the box the kit comes with two options for these parts, decals or stickers.
In order to apply the stickers without making them look like total rubbish you have to cut out the gold parts but even then it still looks awful. The water slide decals that come with would look a lot better, in theory, had they not been some horrible shade of metalic yellow. I chose to paint the trim with some Model Master gold.
Simply put, the good looks fucking fantastic on the kit. The only problem was that that I figured it would be easy to scrap up extra paint that slipped off the trim lines. In my own inexperience this occurred more than it should. My initial plan to scrap up the extra with a hobby knife worked well but left the plastic really scratched up. If you look at the bits close up under good light it’s easy to see. Doesn’t show up in the photos, which is great for me lol.
It was also very frustrating because the OCD part of me wants every line to be perfect. That of course didn’t happen, which you can see in the photos if you look close enough. My excuse is that there are little mistakes in the kit used by Bandai for the instruction booklet. If they can fuck up, so can I lol
I wanted to keep the red used in the kit but add something to it. After testing out a few paints I went with Testors’ 1152, Metalic Red. It has a nice metalic flake that is sort of hard to see in the photos. Several coats with a 2/3 paint-thinner mix went on fantastically.
For the frame I used a bit of metalic weathering which I found to be a waste of time. It doesn’t really make an impact on the over all look of finished version.
The frame, black bits, and gold trim all got a nice dull coat. In contrast the red parts got a gloss coat. Probably the best idea I had for the whole build.
The second most frustrating part were the dry transfer decals. For one or two things, dry works great. When the entire fucking model uses them, Jesus. The worst part is that once they go on, they stay in said position. With water slides you can push them around a little bit till they line up perfectly. If you don’t place your dry decals perfectly the first time, too bad. Even worse was their tendency to just brush off the sheet. Without even applying any force, just trying to line everything up, parts would randomly hop off and decide to stick to the model. Fucking hell.
The end result is what you see here. While up close and before my perfectionist eye things don’t look at great as I had dreamed up. But under normal conditions, and in the photographs, I’m quite pleased with how things turned out.
And no, I did not touch up the photos in anyway. You’ll even see bits where the gold trim is missing, somehow scraping off during final construction.


If you have any questions, please let me know.
Looking for a full fledged kit review? Check out Dalong’s.
* My two RX’s don’t count, even though finished in January I started them in December.