Posted in

PG Strike Freedom WIP 08: Decals

Behold, the long awaited decals!


Click to Enlarge
| On Flickr

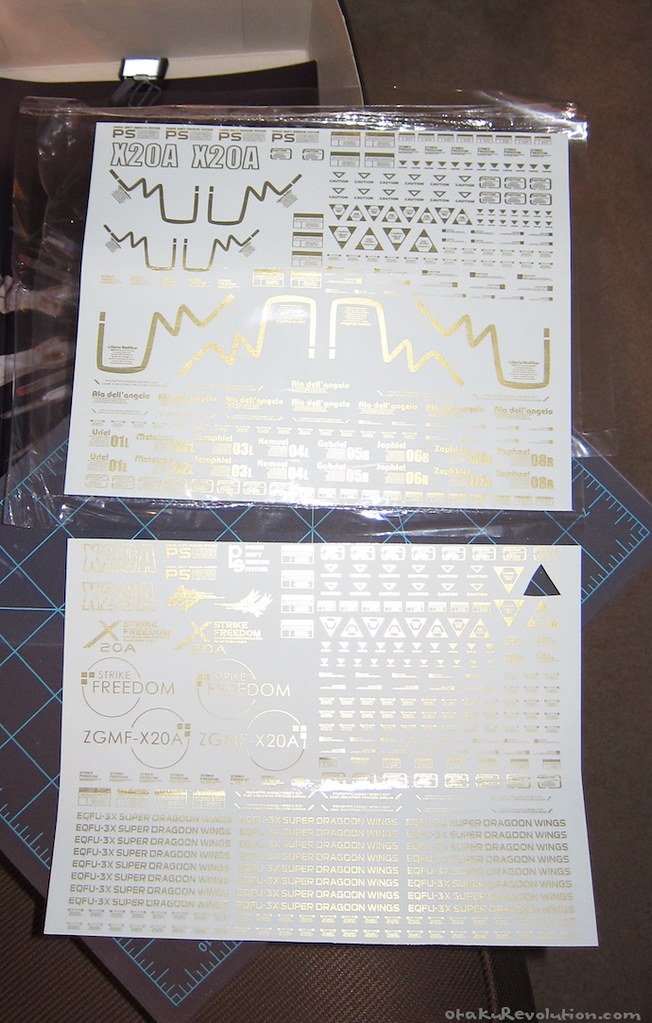
It took just shy of a month for these two decal sheets from Samuel Decal to finally make it over from Hong Kong. How amazing modern civilization has become that a letter can now safely travel half way around the world only to be folded in half by a representative of the United States Government. Fucking hell. At least the damage isn’t too bad and mostly across decals that are in abundance elsewhere on the sheets.

I’m a little disappointed by the sheets though. Upon closer inspection it’s apparent that there’s maybe four different designs repeated ad nauseum. There was a lot greater variety across Samuel’s Red/Blue frame prints. I also noticed that he used gibberish for some of the text, but didn’t bother to do anything about it when he started printing 1/60 scale sheets. The large caution triangles read “Caution gkhihksdgfk abfjkasf asfhiasf” which loosely translates to “Caution: Plot Armor.” read more

Posted in

PG Strike Freedom WIP 06: Golden Boy


Click to Enlarge
| On Flickr

I’ve finally found the time to put in some work on my SF. I painted most of the frame a proper shade of gold. I left the old arms on there to demonstrate the difference in color.

Sadly though, before I could work on the arms or other pieces, I ran out of gold paint. I did start on the rest of the kit although it turns out I’m missing a shit load of sticky tack. (For keeping the pieces on picks during painting) That or there are just so many pieces to this bloody kit. read more

Posted in

Videos from the 2011 Washington Auto Show

While at the 2011 Washington Auto Show this past weekend I took a couple videos with my S95. They turned out alright, not nearly as good as I would’ve liked. Apparently the camera has trouble focusing when the object is 5 feet away.

Make sure to watching in HD for the best possible quality.

The first is a compilation of a few of the featured (as in the auto manufacturers thought they should be spinning around) vehicles at the show.

Posted in

PG Strike Freedom WIP 05: Wing structure, painted!


Click to Enlarge
| On Flickr

After some work I’ve completed the wing structure for my PG Strike Freedom, and painted ’em.

Instead of a blueish-black they’re now a flat black (with a bit of temp gloss coat to protect the paint for the time being).

The gold bits have all been repainted and they look fantastic.

For comparison, a straight build shot from Dalong…


Click to Enlarge
| via Dalong.net

The new gold looks a lot better.

I’m starting to realize the extent of work that’s going to go into this kit. Not just because it’s huge (I giggled like girl when I saw how fucking massive this kit is after attaching the wings for the first time) but because the complex mix of dull and gloss pieces. read more

Posted in

Night of the Living Nemo – Fin


Click to Enlarge
| On Flickr

At long last, my zombie Nemo project has finally come to a close.* The original project started way back in October 2009 and two out of the four Nemo kits were completed less than a month after. The display base never came together as I would have liked and sat outside on my deck for at least a year before I finally tossed the whole thing. The remaining two Nemos remained boxed up, parts carefully separated and labeled, half painted, until late December 2010. (I actually have a fifth, unbuilt, Nemo around here somewhere) read more

Posted in

PG Strike Freedom WIP 03: Main body’s done


Click to Enlarge
| On Flickr

It’s the new year, and time for some new pictures of my PG Strike Freedom.

I’ve finally finished building out everything except for the weapons and massive wings. The color scheme has been finalized (for the most part) and decals are on their way (a second order, hopefully the last).

In the above photo note the discoloration on the fingers. That’s the difference between the color of the plastic and the gold paint that Bandai coated ’em in. The patchy discoloration is a result of sanding down the nubs. I’ve read that people have complained about how the fingers aren’t cast as one solid piece as was the case with previous PG kits. I don’t have that same complaint. Putting them together was easy and the fact that I can take them apart means that getting a proper coat of paint will be easy. read more

Posted in

Jokster’s MG Sinanju

Saw this build over on figure.fm and wanted to share it with everyone here.


Click to Enlarge

It’s his first attempt at a chrome finish and I think it turned out fantastically.

His comments,

Greeting guys and wish you all a Merry Christmas

This is my attempt on making a titanium finish version of the Sinanju . Tried following mtomczek tutorial on painting the titanium finish but sadly the paints required here in my country aren’t available. So i decided to substitute some of the paints that were available here. For the chrome i used rj london chrome spray can paint and used the same mr color clear red and orange paint sprayed via air brush then top coated with mr top coat gloss.

Can i ask you guys how you protect the paint specially in painting titanium finishes, because when i started to assemble the kit the clear paint easily peels off and did a lot of touch ups because of that. Was it the paint that I’ve used? ’cause I’ve found out that the chrome i used was enamel base and mr color was lacquer base and lacquer over enamel doesn’t work well from what the experts say. Any feedback from you guys would be a great help because i want to try this paint job again on my mg sazabi for next year.

Thanks a lot guys


Click to Enlarge


Click to Enlarge

The over exposed whites in his shot look great too.

I’ve seen a lot of Sinanju’s done in metalic/candy red. Haven’t been a fan of most, but I really like this one. It makes me want to start experimenting with the concept immediately, but I have to finish my PG SF first! read more