Formania V Sazabi & Formania EX Sazabi Bust Comparison
Posted in

Formania V Sazabi & Formania EX Sazabi Bust Comparison

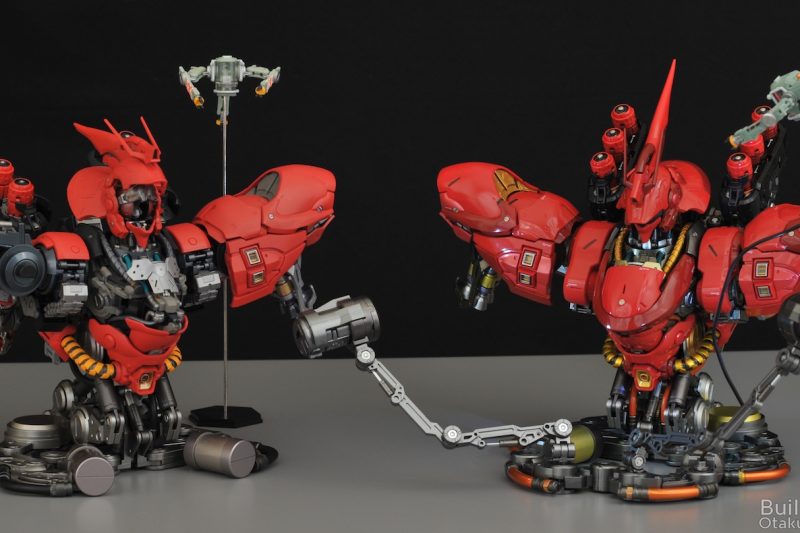
I wanted to share some photos of the Formania V Sazabi and the Formania EX Sazabi. These busts are figures, straight from the box, no need to paint or detail. The Formania V came out in 2010 and the one with a simple flat red colour scheme. The Formania EX just came out in 2017 and is glossy with more complex colour scheme.

For the most part, other than the colour scheme, they’re pretty similar. The newer EX has a lot more metallic details across the bust, but I’m a much bigger fan of the simplistic scheme and colour choices of the original. Both kits have parts that come off to display some of the inner frame. The head opens on each to reveal the cockpit enclosed within. read more

Bandai 1/48 Mega Size Unicorn Gundam – Review
Posted in

Bandai 1/48 Mega Size Unicorn Gundam – Review

As a Unicorn aficionado I was pretty excited to hear about the 1/48 scale Mega Size Gundam Unicorn. My wallet not so much, because you just know there’s going to be half a dozen variants Bandai can release now. Anyhow, just wanted to spend some time reviewing this kit ’cause honestly, as a straight build, it’s sort of meh… but as a “beast of possibility” this kit has more going for it than any previous Unicorn release. PS. this kit is only Destroy mode, you cannot transform into Unicorn mode. read more

BSC 1/35 Unicorn Gundam Bust
Posted in

BSC 1/35 Unicorn Gundam Bust

Did a quick, straight build, of my BSC 1/35 scale Unicorn Gundam bust. It went together over the course of three evenings with very little difficulty. There’s not too much I can say about the build that Great Lakes Gunpla hasn’t covered in two great video reviews. They’re highly recommended for anyone looking to build the kit.

For the most part the BSC Unicorn is essentially a sized up version of the Perfect Grade Unicorn with extra detail and some modifications. These modifications include external detail, additions to support an extensive LED network, more ways for the kit to flap open, and changes so that the kit is built from the ground up compared to the PG. A lot of the pieces are ripped right from the PG, you can even see vestigial connection points no longer used. Of course the mechanical looking stand is original (not sure if it’s pulled from any other busts) and has a lot of potential to look stunning with some added paint. read more

CuteCube 1/100 Wondwart Review
Posted in

CuteCube 1/100 Wondwart Review

If you can’t tell by the opening photo, fuck this kit.

I was fairly excited to hear that CuteCube, yet another Chinese third-party/illegal Gunpla manufacturer, was going to release a 1/100 Wondwart, one of the magnificent Advance of Zeta designs that have thus far received very little love from Bandai. I knew when it was announced that it was going to have issues. Some pieces that don’t fit here and there, some flashing over there, etc. Given its provenance these sort of things are to be expected. And CubeCute’s kit doesn’t disappoint. There are some pieces that just don’t fit right, either too tight or too lose. There’s flashing issues… everywhere. Okay, no big deal. Like I said, it’s to be expected, right? So why the big stink? read more

Desert Kampfer
Posted in

Desert Kampfer

Of the two Master Grade Kampfers in my collection, one goes back at least 15 years and was one of my first Gunpla kits. For 5 years of that life it’s been sitting in a box with its partner, partially disassembled and awaiting one of several different paint jobs I’ve been thinking of over the years. Having not painted a kit in a while I figured it best to dust the kit off and kill two birds with one stone, the second taking an opportunity to test out Vonschlippe’s hairspray chipping tutorial for the first time. read more

Dragon Momoko 1/60 PG Unicorn Gundam – Project Complete
Posted in

Dragon Momoko 1/60 PG Unicorn Gundam – Project Complete

Another build complete, and my first one of 2017. At the very least it can’t get any worse from here. Behold, Dragon Momoko’s PG Unicorn. It’s actually pretty good looking, though the devil’s in the details, and the details is where things went south for me.

Before I discuss my work I want to add to my initial review of DM’s Unicorn

  • The decals are pretty high quality. They’re thick enough that you can place the big ones without worrying about them ripping yet thin enough that they disappear into the paint after you apply MicroSol or equivalent.
  • There are a lot of decals, and if you follow DM’s guide, 50% are unused. There’s just under a half of the giant decal sheet that went untouched. With a bunch that don’t quite work on the kit itself, but seem well suited for an Armed Armor…
  • One of the unique things about the DM’s decals are the line details used on the shin, waist, shoulder, and other places. In the manual they use the decals only on one side for the most part, but in a few areas they use both. They also neglected the decals that go on the outside of the arm (the end of the piece that holds the beam saber). Why they did this? I have no idea. While I followed the decals elsewhere on the kit (aside from a few I added to the feet since they were too bare) I said ‘fuck it’ and used up all the special decals.
  • There are three things on the this kit which are different than Bandai’s (other than all the exterior details that is, and the backpack system if you want to include that too)…
    • The chest/cockpit piece. It’s more pronounced and looks pretty cool but the neck piece that sits on top doesn’t quite fit. You can even see the issue in their official photos. Seems like a lazy thing to get wrong.
    • The shoulder to upper arm bit has bit of extra added on, as though it were there to provide more contact deeper into the arm for extra grip. While they added it, they didn’t actually add anything in the upper arm to make use of that addition. It’s odd, especially since there’s no real reason for it. Of the areas on the PG Unicorn that could use improvement, that part of the arm is not one.
    • In the rear skirt armor, they added an extra notch for the two pieces that make the little square thruster thing. This means it doesn’t fall out before you mount the backer piece, and is a super nifty addition.
    So, about the details. Pretty solid all around. I didn’t encounter any issues with the detail molding. So, about the molding. Well, there’s quite a lot of subtle flashing issues across the kit. The kind of shit that you don’t really notice when it’s staunch white. There were also mold alignment issues (where left side of the mold isn’t 100% matching with the right) which created seam lines across parts, and in some circumstances, a half mm to mm worth of slide (think of when someone cuts through a guy with a sword and the victim slowly slides apart). For the most part everything fit together really well, or at least, as well as can be expected for a fully painted PG Unicorn. Key areas that stunk: the poly caps. They were a smidge too big which make fitment a pain. The shin pieces don’t fit on mine, more specifically, they fit but there’s something about the upper connection that means they keep popping out. The LEDs… well they’re much dimmer than Bandai’s. See the comparison shot below. The wire insulation also pulls away from the light modules really easily. Such that in some of the tighter areas you might look back at the module and see the copper exposed. They’re free, and I shouldn’t complain, but Bandai’s are worth the money and the remote control gimmick is pointless IMHO. There’s also a slight circuitry change which is odd. The kit’s left leg doesn’t light up unless the right leg is plugged in. At first I thought I had some bad wires and was about ready to solder the shit out of the waist piece before I realized what the issue was. Last but not least, the LED set’s 4 separate cables that run from the battery pack to the rest of the kit is a lot more of a pain in the ass to work with Bandai’s two wire bundle.

    Wait, there’s more!

    • You know that weird backpack contraption? It’s really cool, but it’s seam line city.
    • For being built without poly caps, it does a damn good job hold all the weapons (granted all my joints there are somewhat painted).
    • The single mounting point to the backpack is a super obvious point of failure. While mine hasn’t broken, it does like to sag out a bit.
    • In case you didn’t know this, the contraption is a copy of the arms that come with the Tamashii Nation Unicorn MS Girl.

    Final verdict on the Dragon Momoko Unicorn? If you can get it for retail, it’s a hell of a steal and worth a pickup. If you’re looking for a show quality kit, get the real version. Or at least the real LED set. read more

Posted in

State of the Hanger: My model collection as 2016 comes to a close

[flickr-photo:id=32016457125,size=z]

To wrap up 2016 I want to take few minutes and share some details about my plamo/hobby collection, which is predominantly Gunpla based. I’ve had quite a few folks ask me for info about my collection, and display set up, but have been lacking any single place to point them. Before I start I’d like to thank all of the builders out there who whose simple and complex works have pushed my builds further and driven the Layman’s Gunpla Guide. In particular I’d like to thank those on r/Gunpla and (the now renamed) Gundam Complex on Facebook. Of course a shoutout to the place I’m most guilty about being absent from, Gundam Australia. Over all, the Gunpla and plamo communities are some of the best hobby groups out there.  read more

Posted in

Dragon Momoko 1/60 PG Unicorn Gundam – Project Start & Initial Review

[flickr-photo:id=31289879216,size=z]


The next in another long line of “screw it, I’ll build another Unicorn” is Dragon Momoko’s 1/60 Perfect Grade Unicorn Gundam. As a huge proponent of buying official Bandai kits wherever possible, you’re probably wondering why I’d bother with a standard bootleg Unicorn. Dragon Momoko’s Unicorn kit unlike the other Chinese copies out there in that comes redesigned with a plethora of added detail to the outer frame.

  read more

Posted in

Layman’s Gunpla Guide – Pre-Shading Tutorial

Have you ever looked at a finished kit and noticed that the paint has a bit of depth? That the edges have a subtle darkness to them? Well that’s the result of a very common technique in the modeling world known as pre-shading.

Pre-shading, at it’s simplest, is essentially a layer of darker paint under the top colour to make certain areas pop-out. Commonly used in model aircraft to highlight panel lines it’s been adopted on Gunpla for panel lines as well, or more often, shading around the outer edges of a piece. read more

Heaven & Hell, a MG Unicorn Project – Hell Redux
Posted in

Heaven & Hell, a MG Unicorn Project – Hell Redux

Back in 2014 I swapped out the pyschoframes of a MG Unicorn Gundam and a MG Phenex Gundam. While I had intended to paint them, they unfortunately got set aside as different projects popped up. Now, over two years later, I’ve picked up the project again, starting with Hell.

Not too much to say about this project. For the most part things went well, though I was delayed a few days as I sanded and repainted a few times to get the gold coat as I could reasonably hope to obtain. There are a few pieces that I would’ve reworked a few more times, but I set myself up to get the kit completed by October 31st for a r/Gunpla group build. Paint wise, I used four different golds; Tamiya Titanium Gold, Tamiya Gold Leaf, Model Master Gold, and Valspar Brilliant Metal Gold. The red is Tamiya Flat Red and the frame Tamiya German Gray. To keep the gold looking gold, I didn’t use any top coat on the gold pieces. read more