PG Unicorn Gundam – Final Battle Version – Complete
Posted in

PG Unicorn Gundam – Final Battle Version – Complete

Doing something a bit different with this build and putting all my usual notes down at the bottom. They’re poorly written and filled with anger and shouldn’t be read under most circumstances.

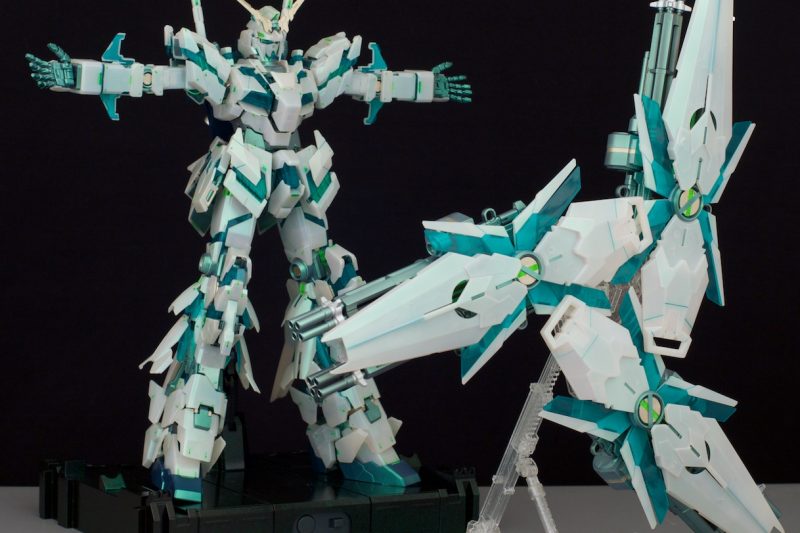
Forewarning, my camera has a hard time working with all the UV light that seeps through this kit. IRL it looks more green with the LEDs on. So help compensate, here’s a mix of LEDs on and LEDs off.

Excuse my French, but what a cluster fuck this build was. Throughout the planning stage of this build the plan went in a lot of different directions but the goal was always the same. Find away to spiffy up the Final Battle Unicorn, like it was about to take on a shot from Gryps, without it going full shamrock. While I was tossing ideas around I saw that the (at the time) upcoming Daban PG Phenex kit was going to be molded in clear plastic. “What a great opportunity,” I said to myself, “I can strip the gold for the clear plastic underneath (like my Hyaku Shiki) and make the psycho frame pop.” And that’s when the build got flipped, turned upside down. read more

Posted in

Zeta Gundam Memorial Box – Part I

Over the past few years I’ve seen a couple folks share images of their Laserdisc Zeta Gundam Memorial Boxset and I eventually picked up a set for myself. Laserdisc? Well, apparently it has all the original openings and endings in great quality without some of the issues on the US DVD release. Don’t ask me, I have no plans of picking up a Laserdisc player to find out. I got them for the really cool artwork and, to me, collector value. They ended up being away more impressive than I originally thought so I figured I’d snap a bunch of photos and share ’em for anyone interested. read more

Motor King – 1/100 Zaku Tank Quick Review
Posted in

Motor King – 1/100 Zaku Tank Quick Review

I recently picked up a built Motor King’s 1/100 scale Zaku Tank. Unfortunately August has me running around super busy so it was nearly all I could do to simply build this thing in the first place. So, instead of a super long wordy review, here’s a relatively short one with some simple photos. If you want more specialized photos, like the runners or how the kit looks with the LEDs installed, check out Samuel Decal’s Facebook album.

For starters, I don’t really know much about Motor King, so I’m not sure what they’ve done before. As such, I can’t really compare it to any of their past kits, but I can compare it to Elyn Hobby/Mechanicore as I have built some of their third party kits. More on that in a bit. When you get MK’s Zaku Tank you get 16 runners, one of which clear, one of which is a handful of polycaps. You also get 10 LEDs and enough cables and resistors to write them up into a single circuit. Soldering not included. I’m fairly certain everyone is supposed to get the LEDs, but at least one person I spoke to was left hanging. The wiring diagram is printed in the manual, and a few screws come in the same bag, so I don’t think it’s a pre-order only bonus (I didn’t pre-order). There are some water slide decals in there as well. read more

PG Banshee Gundam – Complete
Posted in

PG Banshee Gundam – Complete

Build Review

As is tradition, I’m going to open up with a lengthy recap of this build. I always figure some folks out there will benefit from knowing my trials and tribulations as they work through their own builds. If you’re not interested skip on down to the pretty pictures at the end of his article. If you like this build please check out my last PG Unicorn, which I built and painted in a single week, or my last painted kit, the 1/100 Elyn Hobby Kshatriya.

Paints

The first thing you’re probably looking to ask, “What’s that sexy purple?” Well it’s Mr. Crystal Colour’s Amethyst Purple (XC04). For the most part it’s straight on top of the gray frame, but in various areas it’s properly painted over gloss black. More on that later. The rest of the colours used on the kit include… read more

Posted in

PG Banshee Gundam – WIP Update

It’s been a long while since I’ve posted anything Gunpla related. This has been partly because I’ve been super busy, and partly because the kit I’ve been working on has been yet another Perfect Grade. This time, it’s the PG Banshee. Since I’m not attempting to build this in a single week, like my last PG Unicorn, this one has taken ages. The first paint tests took place a whopping 3 months ago. The backpack and beam magnum got finished a month ago while I only finished the torso yesterday. If all goes well, I’ll finish this kit by the end of the month. In the meantime, here’s how things are currently looking… read more

Posted in

G Gundam gets BluRay box sets!

Finally, the news I’ve been waiting for… G Gundam is finally get a remaster and BluRay release!

G Gundam will be released in two box sets, ¥34,000 a piece… which is roughly $310 US. If you didn’t already know, Japanese BluRay box sets are ridiculously expensive for various, somewhat nonsensical, reasons. Good news is that there are some subbing groups who will likely release rips, potentially with the original US dub for your nostalgic pleasure. Still no word on whether RightStuf/Sunrise/Whomever will be releasing it stateside. I think it’s a sure thing we’ll be getting one, but probably not until mid to late 2017 at the earliest. read more

Mechanicore – Tief Stürmer/Deep Striker Kit Review Part 8: Final Kit Review
Posted in

Mechanicore – Tief Stürmer/Deep Striker Kit Review Part 8: Final Kit Review

Welcome to final portion of my multi-part review of Mechanicore’s 1/100 scale Tief Stürmer. At last, the long awaited full review of this massive build.

As with most of my posts, enjoy a wall of text up front where I discuss the kit followed by a ton of photos down below. If this it he first time you’re checking out the review, and you’ve got a Tief Stürmer to build of your own, please check out the prior sections. In them I tried to write about all the issues I ran into during construction so you’ll be better prepared. Some of the issues I harp on about are more evident in the prior sections as well. read more

Mechanicore – Tief Stürmer/Deep Striker Kit Review Part 7: Stand and Final Assembly (Step 18 and 19)
Posted in

Mechanicore – Tief Stürmer/Deep Striker Kit Review Part 7: Stand and Final Assembly (Step 18 and 19)

Welcome back to my multi-part review of Mechanicore’s 1/100 scale Tief Stürmer. In this section I’m going to talk about the stand and how things went assembling all the various components.

Review Menu:

Common Issues

This is a quick list of the common issues on the build. They apply pretty much across the board and pop up so much that I’d probably go crazy trying to specifically mention each time it occurs throughout the build.

  • Beware pegs and holes with fitment issues. Whenever inserting pegs watch to make sure that the peg actually fit. Quite often they’re too large for the hole they’re supposed to go into. This can be resolved by a properly sized drill bit (use an hand held driver instead of an electric one, or be very careful, to avoid going through the other side of the piece) or with a fine round metal file to widen it from the inside out.
  • Beware pieces who’s sprue connection often coexists with an important piece. In other words, runners have been connected to the pieces themselves in areas that are also happen to be connection points to other parts of the kit. Never cut flush with the plastic to get it off the runner (which you shouldn’t be doing anyway. For the second cut, make sure you check out the part and how it’s going used to make sure you don’t lop off something important.
  • Beware pieces with subtle flashing around the connection points. Connection points may have subtle flashing issues that result in a poor fit. If something doesn’t quite work like it should, make sure this is not the case before proceeding. Use of a hobby knife is recommended to clean these areas up.

Build Notes

  • There are quite a few piece that really should be glued into place. Since I intend to go back and paint I’m holding things together with masking tape.
  • Because I’m going back and repainting I’m not applying any of the metal detail parts at this point. When I finish the build, and add them, I’ll add any additional thoughts regarding their application to this review.

The Stand

The stand is rather well made to support the rest of the kit. It’s build from thick, semi-transparent black plastic. It’s nice and sturdy but you have to be careful when removing the pieces from the runners. Transparent plastic is generally more brittle than coloured plastic and more likely to have separation anxiety. That is, nub marks. Combine that with the added thickness of the pieces and you’ve got a recipe for some nasty nub marks. Don’t be wanker like I was rushing through construction, take your time and use a sharp hobby knife here. read more

Mechanicore – Tief Stürmer/Deep Striker Kit Review Part 6: Rear Boosters and Booster Legs (Steps 13 through 16)
Posted in

Mechanicore – Tief Stürmer/Deep Striker Kit Review Part 6: Rear Boosters and Booster Legs (Steps 13 through 16)

Welcome back to my multi-part review of the of Mechanicore’s 1/100 scale Tief Stürmer. In this section I’m going to cover the rear boosters which consists of two large units that are incorporated in the legs and two smaller units that come out of the back.

Review Menu:

Common Issues

This is a quick list of the common issues on the build. They apply pretty much across the board and pop up so much that I’d probably go crazy trying to specifically mention each time it occurs throughout the build. read more

Mechanicore – Tief Stürmer/Deep Striker Kit Review Part 5: Arms, I-Field Generator, and Secondary Gun (Steps 10, 11, 12, and 17)
Posted in

Mechanicore – Tief Stürmer/Deep Striker Kit Review Part 5: Arms, I-Field Generator, and Secondary Gun (Steps 10, 11, 12, and 17)

Welcome back to my multi-part review of the of Mechanicore’s 1/100 scale Tief Stürmer. In this section I’m going to discuss the arms, rifle, and I-Field generator.

Review Menu:

Common Issues

This is a quick list of the common issues on the build. They apply pretty much across the board and pop up so much that I’d probably go crazy trying to specifically mention each time it occurs throughout the build.

  • Beware pegs and holes with fitment issues. Whenever inserting pegs watch to make sure that the peg actually fit. Quite often they’re too large for the hole they’re supposed to go into. This can be resolved by a properly sized drill bit (use an hand held driver instead of an electric one, or be very careful, to avoid going through the other side of the piece) or with a fine round metal file to widen it from the inside out.
  • Beware pieces who’s sprue connection often coexists with an important piece. In other words, runners have been connected to the pieces themselves in areas that are also happen to be connection points to other parts of the kit. Never cut flush with the plastic to get it off the runner (which you shouldn’t be doing anyway. For the second cut, make sure you check out the part and how it’s going used to make sure you don’t lop off something important.
  • Beware pieces with subtle flashing around the connection points. Connection points may have subtle flashing issues that result in a poor fit. If something doesn’t quite work like it should, make sure this is not the case before proceeding. Use of a hobby knife is recommended to clean these areas up.

Build Notes

  • There are quite a few piece that really should be glued into place. Since I intend to go back and paint I’m holding things together with masking tape.
  • Because I’m going back and repainting I’m not applying any of the metal detail parts at this point. When I finish the build, and add them, I’ll add any additional thoughts regarding their application to this review.

Arms

The arms are pretty basic. Aside from the shoulders, they’re pretty much ripped straight from the original MG S-/Ex-S Gundam. Now pointless transformation gimmicks and all. The TS does come with fully articulating hands, which is good, but no support for notched weapons, which is bad. read more