


Masking is a very important step when it comes to detailed painting. Once you venture from painting whole pieces, you will find that great detail can come from treating different parts of the same piece differently. To do so, you'll need to mask the pieces to avoid getting paint on the rest of the piece. While primarily used when applying paint via a can or airbrush, it can be used during hand painting to ensure a straight line.
Tamiya v. Off the Shelf
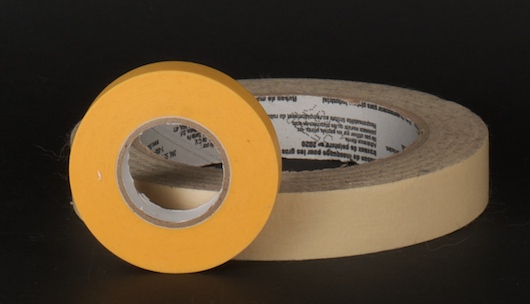
When masking pieces, I highly recommend getting a hold of some Tamiya brand masking tape (the yellow roll in the above photo). While your average beige brand is effective in stopping paint I've had many issues with paint seeping in along the edges. As a result, I do all of my edges with Tamiya and cover the rest with the generic stuff (blue painters tape or otherwise).
Forming Edges
Depending on the piece you're planning to mask, the process will either be incredibly easy or a huge pain in the ass. Which category it falls into is usually dependent on the line you're following. Straight lines are the easiest but you're likely to encounter curved, uneven, and otherwise odd surfaces. The trick here is to find an anchor point for one side of your piece of tape. Then, using your fingernail or other rounded edge (like a blunt toothpick), slowly form the edge you need. If you can't get a precise edge with the tape, overlap a bit and trim with a hobby knife. It's sort of hard to explain, so here's a great video via Ghost of Zeon explaining the process...
If you're having difficulty getting the tape to follow a line consider doing some touch ups by hand afterward. It's almost inevitable at some point.
Once you've finished the appropriate lines, you can cover the rest of the piece (may not be necessary if you're really good with an airbrush). Be sure to overlay pieces of tape to prevent paint from entering through the gaps.
Masking Solutions
In addition to tape there are liquid masking solutions out there such as Microscale's Micro-Mask and Gunze Masking Solution. I've used Micro-Mask here and there for a few areas where the hard lines of tape don't quite work. Application is pretty easy, brush on and let dry. The issue I have is that the dried solution can be rather difficult to remove. There's often not enough of a lip to simply peel it off by hand, and using a scapel may risk scratching the paint. The best method is to use a bit of masking tape. Apply it to the area, and it should hopefully grab the dried solution when you remove it.
Remove Carefully
Last but not least, take your time when removing the tape. After all the effort you went to applying and painting, the last thing you want to do is rush. Chances are the tape will be hard to peel away by hand and a hobby knife might come into place. Just make careful cuts on the other side of any visible surface to minimize the chance of nicking something important.


