


The most popular way to make your kit look its best is to paint its detail lines. Some people think kits look best with out them while others think they look best when done in heavy black. The popular consensus however is that you should line with a color and darkness relating to the plastic you’re working on. For example, when lining on white use a light gray. For medium colors try a darker gray, and on dark or somethings vibrant colors use a black. If you’re lining with paint try to mix in portions of the base color for a subtle effect. Remember to try different things and go with what you think looks best.
That said, here’s a list of some of the most common and basic tools you’ll need to spruce up your kit’s detail lines. Note that the actual tutorial on the detailing process can be found here.
Basic Detailing Equipment
Mechanical Pencil
The easiest way to line is with a mechanical pencil, 0.5mm in size or smaller. Easy to use and fairly easy to clean up. Generally a pencil will give you the perfect gray to use while working on white (or similair) pieces.
Gundam Markers
Your basic Gundam Marker is essentially a paint pen that comes in the most common of Gundam colours. It’s meant for touching up small spots on a kit, not for line details. I generally recommend folks shy away from these, and if you do use them, apply to a small paint brush and use that on your kit instead. It’ll allow for closer attention to those small details than you could normally get.
Fine tip Gundam Markers are meant for taking care of those detail lines. Frankly I haven’t used them much, having started with, and liked, other markers first. Despite this a lot of people have used them successfully and they’re great for beginners.
One of the markers I like are the Real Touch series of Gundam Markers. Real Touch markers come with two tips, one fine and one larger to help cover more space. In my experience (please note it’s been awhile since I did a comparison) they’re easier to clean up than traditional fine tipped Gundam Markers, all you need is an eraser. The larger tip also allows you to fill in larger areas easier and, if used properly, can also provide basic shading in some instances.
Bandai also makes Weathering Markers, info on those can be found in the weathering section.
Alternative Markers/Pens
When it comes to doing detail lines Sakura makes a fantastic alternative to Gundam Markers. Their line of Pigma Micron pens are available in several colors and in various sizes. The only two sizes you should really need are 005, .20mm and 01, .25mm. Most of the time the .25mm will work just fine but some of the details on Bandai kits can be quite small requiring the .25mm tip. That .05 makes a quite a bit of difference toward getting clean lines but the smaller tip is more likely to wear out before the ink runs dry. The best part is that they clean up really well with an eraser (clean right when you make a mistake, depending on the surface you’re working on it won’t erase when dry) and they’re available at most arts & craft stores.
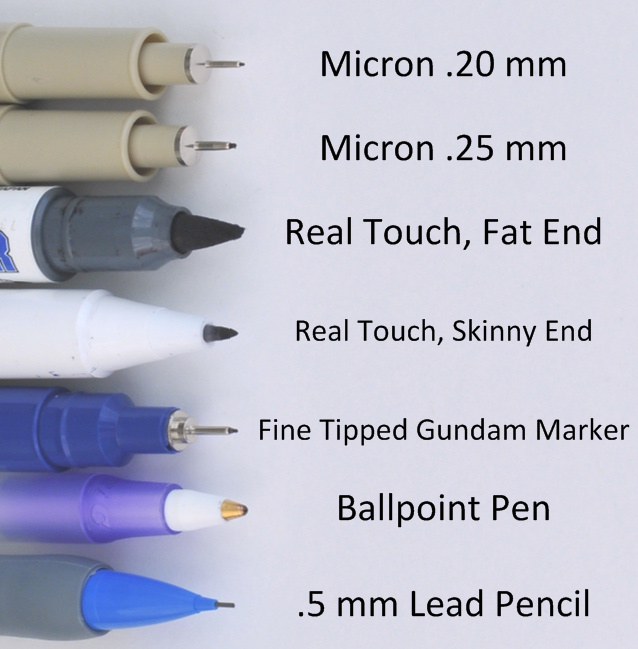
Unfortunately Micron doesn’t come in gray. For ease of use there you’re still looking at a pencil or a Gundam Marker. Copic makes some nice gray pens but I haven’t found any that are dark enough/have the right shade.
Cleaning Tools
If you’re using a Micron Pen, Gundam Real Touch Marker, or a pencil you’ll want a good eraser on hand. I’m not talking about the crappy pink ones that come on the end of a number 2 pencil, but a proper polymer like Pentel’s Hi-Polymer block eraser. When used properly they don’t streak on and leave a nice clean look. Just be aware of build up on the eraser itself which could transfer back to your kit.
Gundam Real Touch Marker sets come with a cleaning marker that works pretty well, but only under the right set of circumstances. If you’re detailing an unpainted kit you can clean up the excess with some fine sandpaper or even a quick scrape with a hobby knife.
Panel Wash Detailing Equipment
The simple tools listed above work great nine times out of ten. Sometimes, however, you need to spice things up with a colour you can’t get in a pen or want to leverage the super clean look that’s possible when you detail your lines with paint. Again, below is just a basic assortment of tools you’ll need and the actual tutorial can be found here.
Paint and Thinner
This should go without saying. Can’t really panel wash without paint and you can’t really thin that paint without thinner appropriate for that paint. What type of paint and thinner you use is dependent on what surface/paint you’re working on. More on that here.
Mixing Stir & Mixing Container
You’re going to need something to mix the paint and thinner, plus something to mix it in. Depending on the amount you’re mixing you can use a paint jar’s lid, or a whole jar. For mixing a toothpick or piece of old runner will do nicely.
Paper Towels or Q-tips
Part of the process of applying a panel wash will inevitably leave a bit of paint behind. To clean this up you’ll either need some Q-tips or paper towels. When picking out a paper towel look for one that’s not too fluffy. Sometimes fluffy paper towels can leave behind small bits of that fluffiness which you don’t want on your kit.
Fine Tipped Brush
When applying the paint it’s best to use a strong, fine tipped brush. The more precise the point the better. The key is to use a brush with a fine tip that will allow you to get in and work on details without brushing against other pieces or sections around the part that you’re working on. While I can’t point out any brands specifically make sure to get a brush whose tip won’t fray or pull easily. The quicker the bristles wear the quicker you’ll lose that edge and need to replace the brush. I’m not aware of any conflicts between most model paints and bristle type.
 |
Brush Maintenance: Properly cleaning your brush after ever use will greatly extend its lifespan. Letting the paint dry can make removal difficult and damage the brush’s head. What I like to do is to take the brush head, submerge it in the cleaning solution, and gently brush the side of said container. This helps work solution into the head and remaining paint out. Once everything looks clean rinse with water and brush a paper towel till it dry. |