


This tutorial was contributed to the Guide by the great Vonschlippe! You can check out some of his builds on imgur or catch him helping others on r/Gunpla. If you see him around please give him your thanks let him know what you think of the tutorial. – Falldog
There is a lot to say about oil weathering. For starters, it’s the best technique to simulate any kind of grime, residue, oily streak, dust, stain, and filth out there. It is less risky than enamel weathering because all the solvents involved are safe for plastic, and the longer drying time means more flexibility for adjustments and cleanup. It’s a great tool to add to your arsenal.
The basic technique is deceptively simple: it involves using oil paints (the same kind used by artists on canvas) to apply coats of paint to weather a model kit. However, there are many approaches, techniques and tricks to doing this, and I’m going to try to cover them all. This tutorial will describe the products involved and the main techniques for oil weathering.
Oil Paint and Thinner
Model painters are probably familiar with the three most common types of hobby paints, namely acrylic, enamel and lacquers. The oil paint used for oil weathering belongs to an entirely new family – artist oils. Unlike enamel, which uses a petroleum based oil for a solvent, the main thinning agent present in artist oils is linseed oil. Linseed oil is a thick, natural oil obtained from the flax plant, which is completely harmless to paint and the styrene plastic used in kits. Linseed oil does have some downsides however. It tends to make oil paints glossy, which is not desired on most weathering effects, and it takes forever (weeks! months!) to fully dry up and cure the paint. This is why although it is already present in the paint, linseed oil is never used as a thinning agent when painting with it. We use other thinning agents, which are much more volatile and as a result allow thin coats to dry much faster.
The traditional oil paint thinner is turpentine, and it is still used by some model makers. I do not recommend using turpentine however: it is caustic to plastic and has an extremely overpowering smell which requires a lot of ventilation and the use of a mask. Some substitutes to turpentine such as white spirits (UK) or mineral spirits (US) are also to be avoided: they are naphtha-based solvents which may attack styrene plastic. A single wash could cause some cracks to appear on your kit or worse, disintegrate it entirely! The best product is an odorless turpentine substitute called Turpenoïd. It’s made by the Weber company and is traditionally found in a white and blue bottle. It’s completely harmless for all paints and plastics!
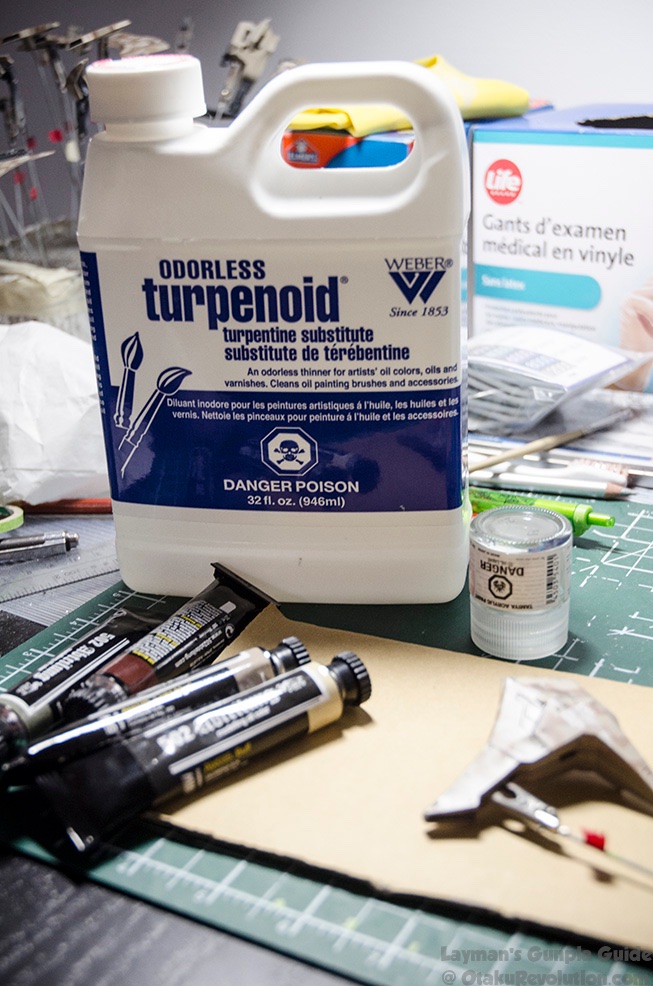
Avoid natural turpenoïd (green bottle) as it is not the same product and has different properties. If Weber turpenoid is unavailable in your area, I suggest making tests with other brands of odorless turpentine substitutes by soaking pieces of runner for an extended time to see if any reaction occurs. You want a thinning agent that’s safe for plastic!
Now we need to choose paints! There are countless artist oil brands out there for you to choose from. A lot of model makers get away with regular, artist branded oil paint tubes. In this case, you may need to mix and match some colors together in order to obtain a precise shade for a wash or effect, since artist’s oil colours come in somewhat narrowly limited sets of pigments. However, there are oil paint brands aimed at model making, the finest of them all being 502 Abteilung paints, by MiG. These paints have the finest pigment density and they contain less linseed oil, which means a matte finish and faster curing time. They also come in pre-mixed colours for weathering (“industrial earth”, “light sand”, “dark rust”, “starship filth”, and so on). I strongly suggest picking them up if you can get your hands on them.
Oil Weathering Techniques
As mentioned previously, the linseed oil contained in artist oils slows down the curing time and leaves the paint glossy. The first step to every oil weathering technique is getting rid of as much linseed oil as possible. In order to do this, place a drop of oil paint onto a scrap piece of corrugated cardboard. Within 15 minutes, you will see a circle of grease soaking into the cardboard around your drop of paint: that’s the linseed oil leaving the paint! Oil is slow to dry; you don’t have to worry about the paint drying out prematurely on the cardboard for at least several hours.
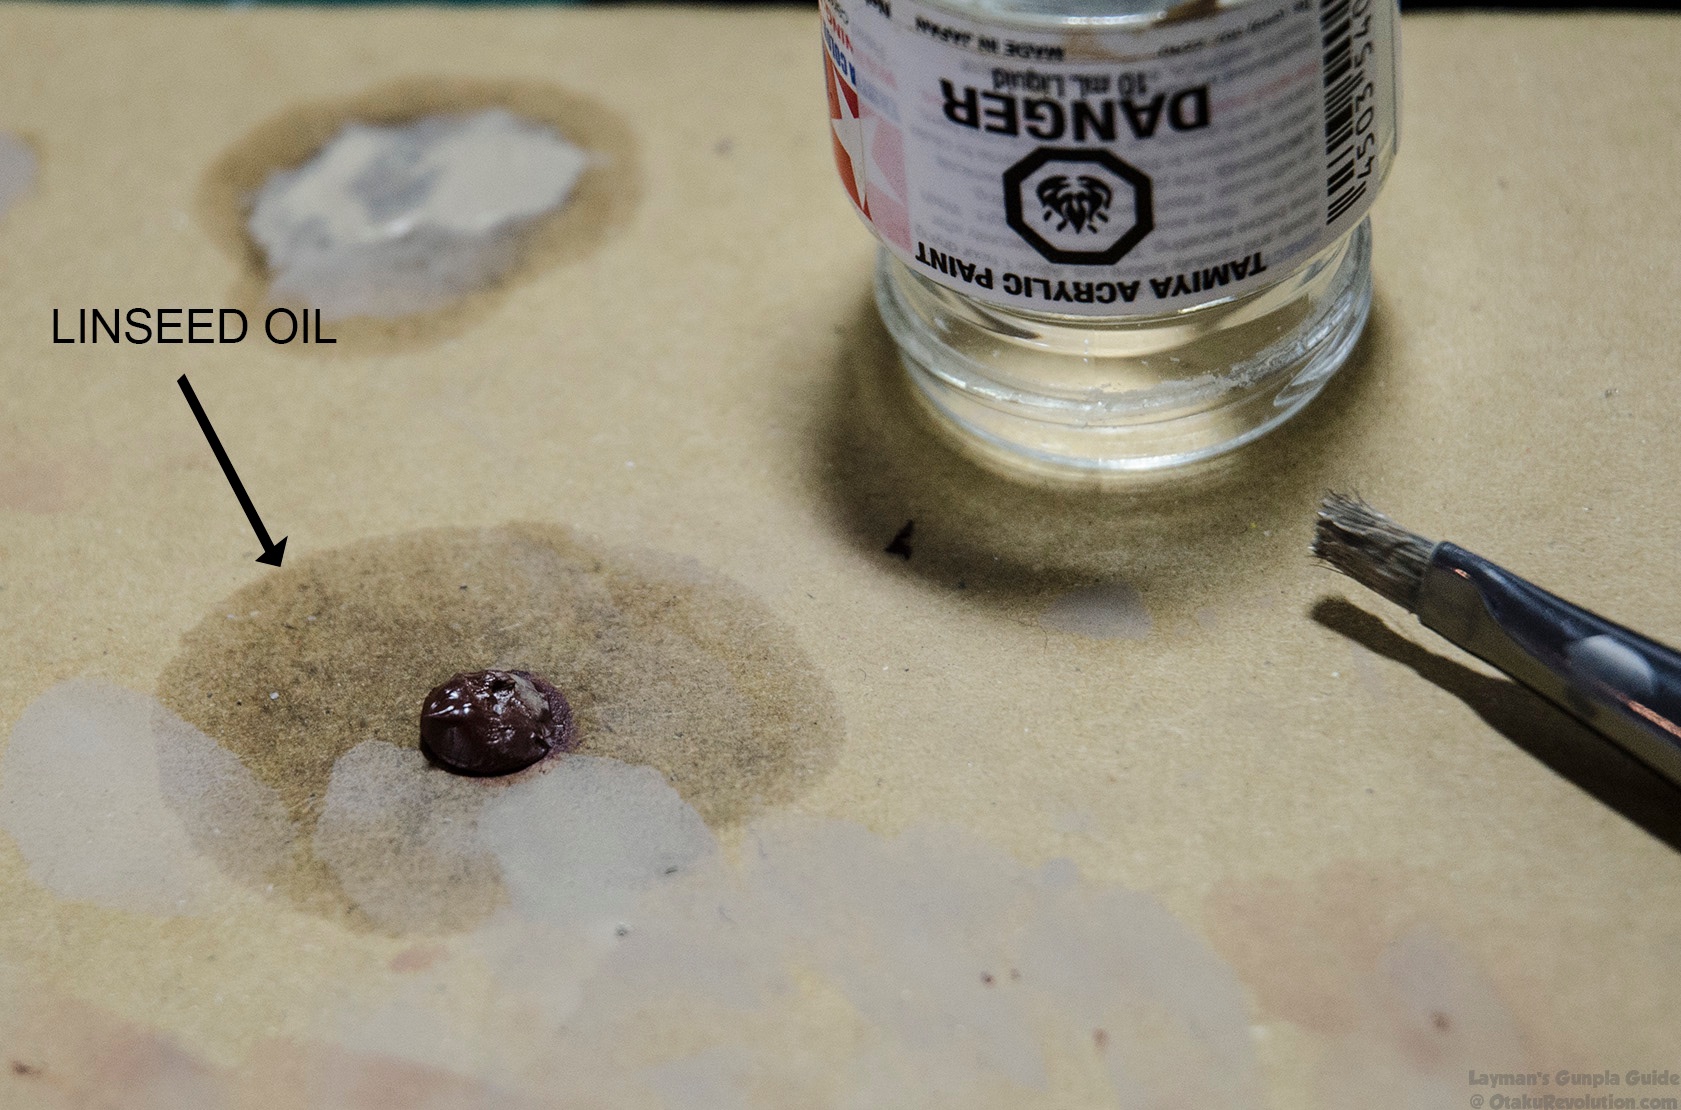
All the following techniques involve paint that’s been de-greased this way. It’s an optional step but it will greatly speed up the drying time of a coat and increase the properties of the finish.
The Filter
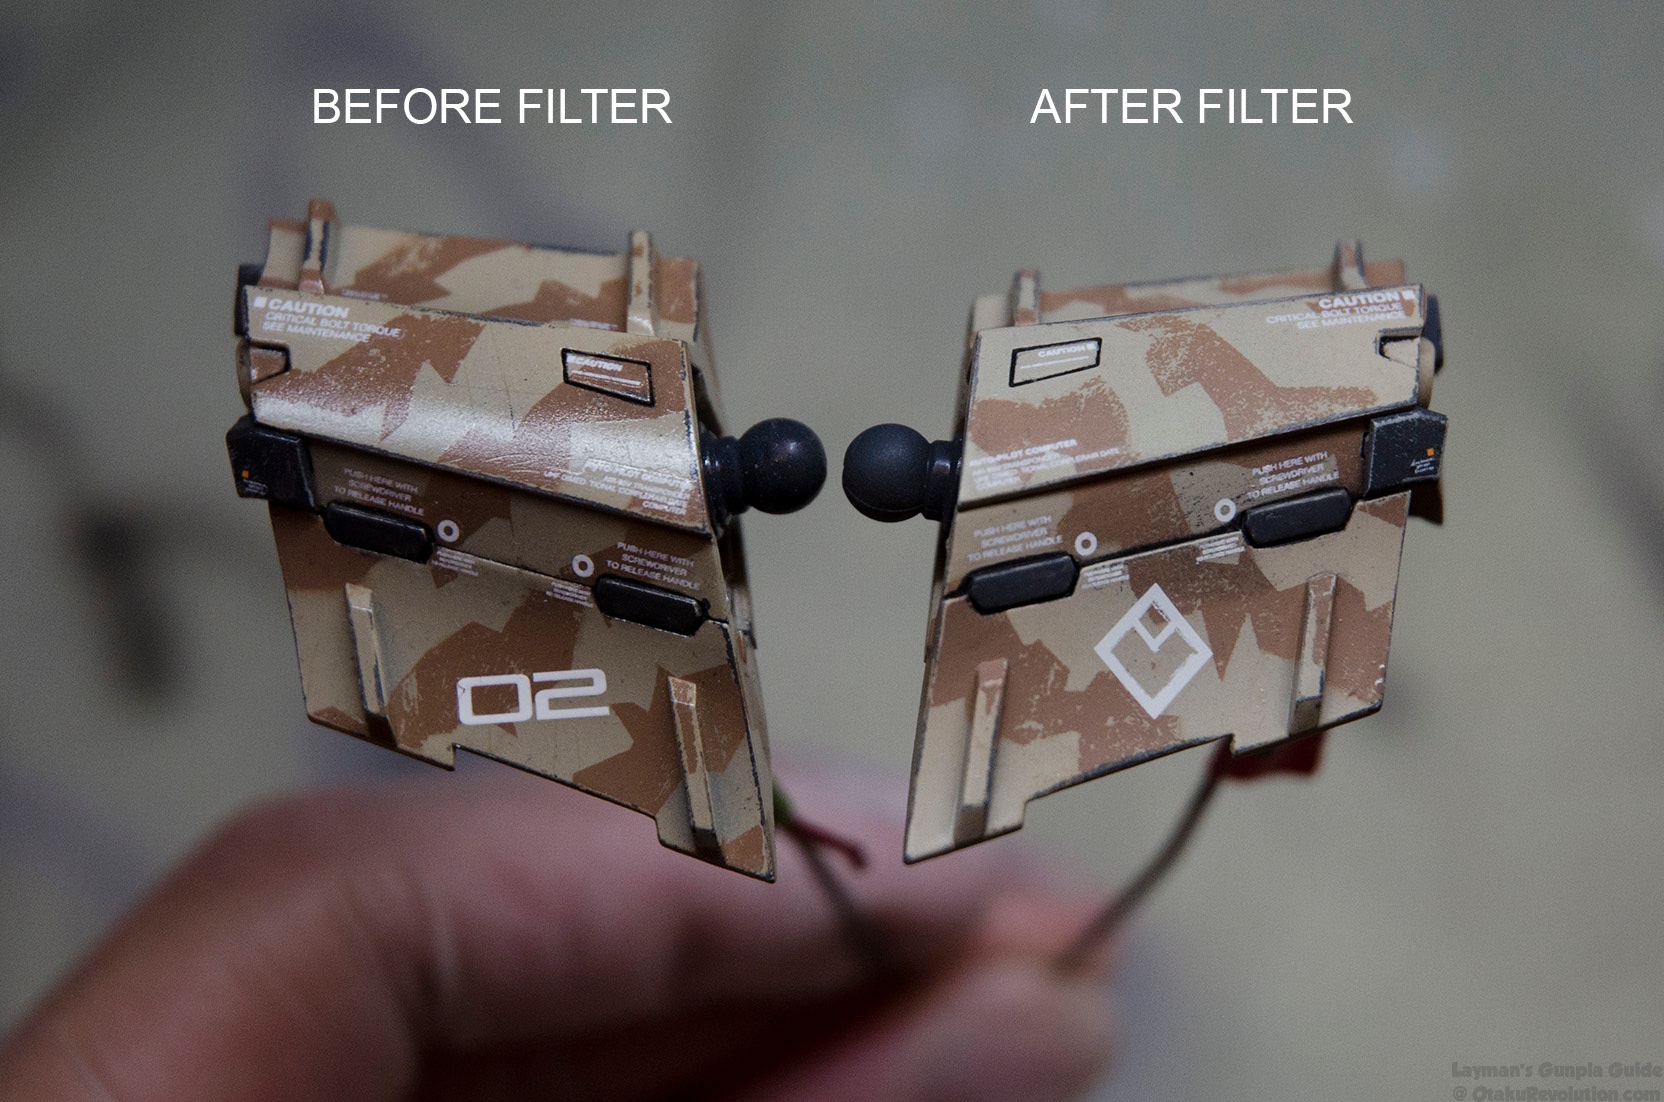
A filter is applying an extremely thin layer of even paint onto the kit’s surface. Its effect is barely noticeable, but it serves many purposes. It allows you to subtly modify the colour the paint scheme, adds a great deal of “depth” to the color coat, it removes gloss from the finish, and it reduces contrast between the many colors involved in a paint scheme for increased realism. As such, it’s used when very light weathering is required and more as a color control technique. When the objective is to add grime, dust, and heavy amounts of weathering on top of all this, the oil wash technique is more appropriate.
A filter is traditionally around 5% paint and 95% thinner, although you can play with this ratio a bit because these proportions are eyeballed. It works best on a matte or semi-gloss surface. On a flat bottomed container (such as the upside down bottom of a glass paint jar), add some de-greased paint and thinner in order to make a light, translucent slurry. Apply quickly and evenly with a large round brush. It’s not a precise technique. If it’s done well you can hardly tell you’ve applied anything; however results should become apparent once you let it dry and compare it with an unfiltered part!
A single filter can do the trick, or you may want to layer them in order to achieve precise color control. Give yourself at the very least 24 hours (48 is best!) of drying/curing time because otherwise the next application will affect the previous coat. Weathering is a long game where patience is key!
The oil wash
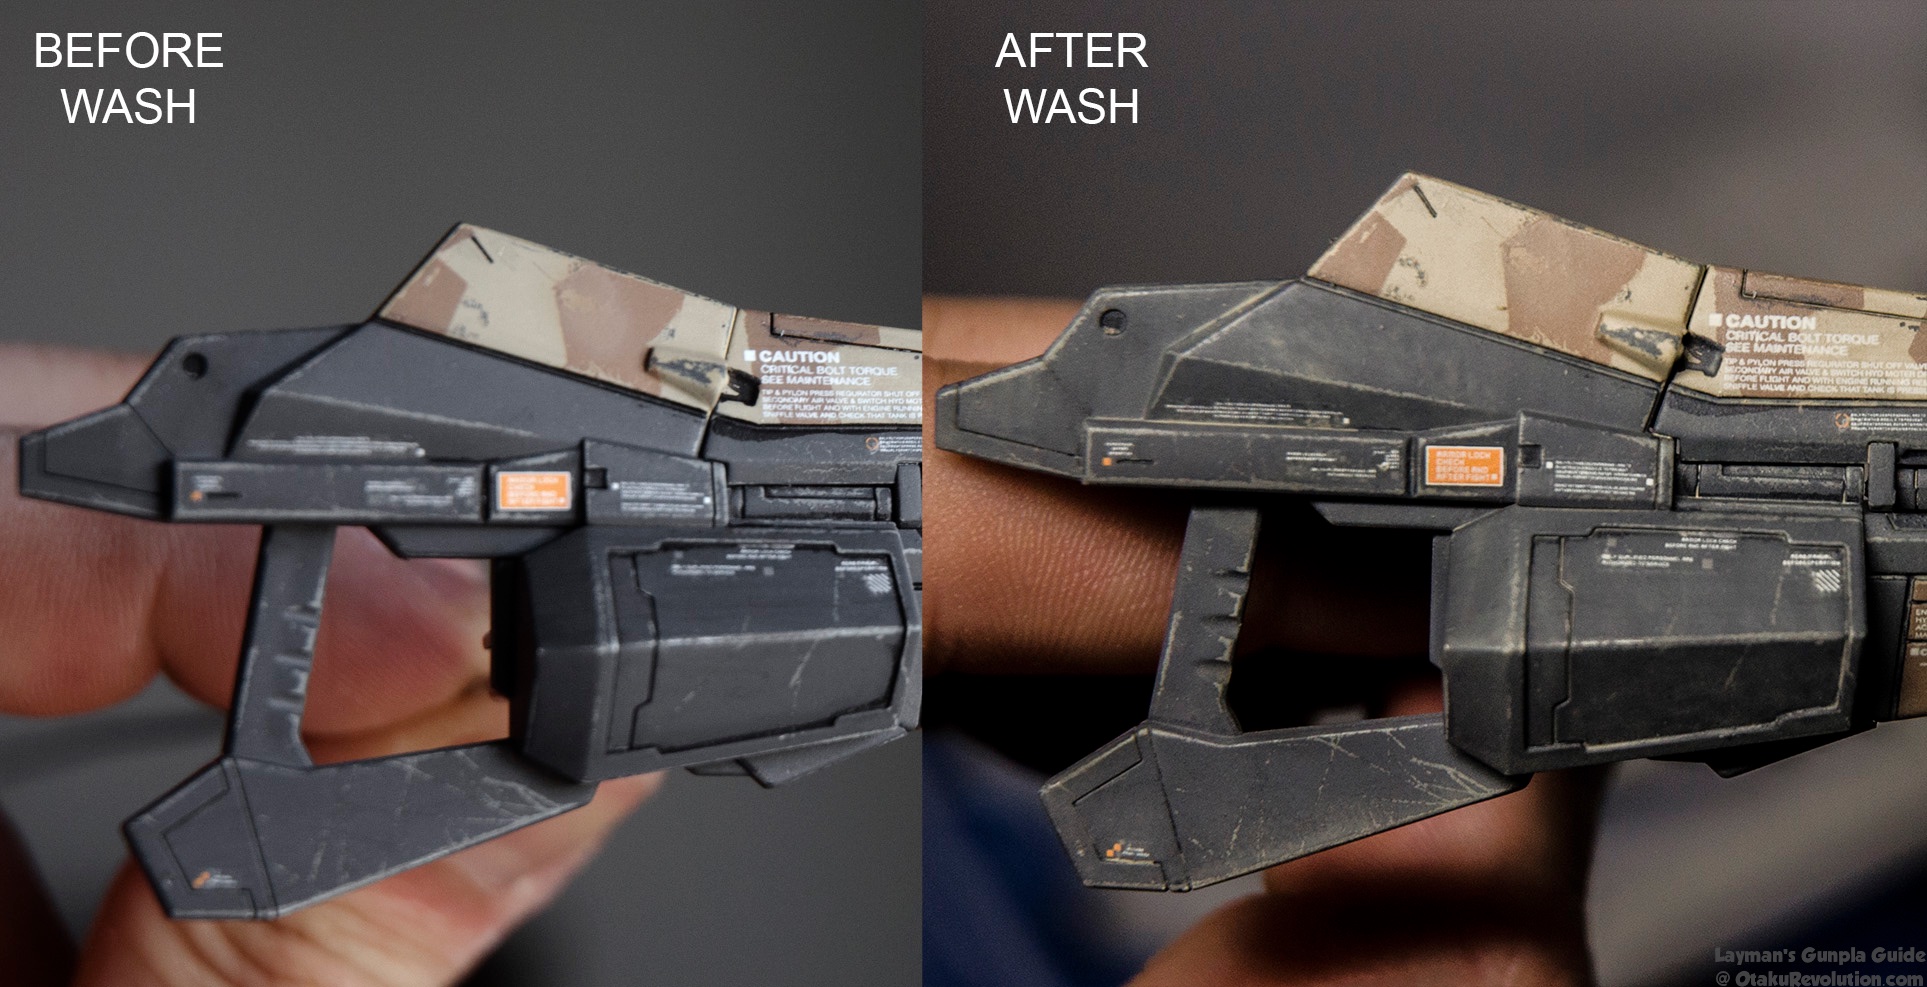
A wash involves applying a moderate amount of oil paint onto a kit’s surface in order to simulate the accumulation of grime, dust and filth into every recessed surface and panel line. A well-known example of a wash is the common enamel panel line wash, which serves to highlight lines and features on a kit. An oil wash combines a filter and a panel line wash into a single process; it is also complementary to both, and may serve to reduce the “cartoony” look created by contrasting panel lines. It reigns supreme in terms of scale-realistic simulation of some weather effects. A wash work is typically 20% paint, 80% thinner. This proportion is extremely variable, depending on the desired effect. As such it may be a good idea to avoid thoroughly mixing the paint and thinner; add a dollop of degreased paint to a flat bottomed container and a reasonable amount of thinner – but don’t mix them too much! That way you can choose to dip your brush into more or less concentrated areas of the paint slurry.
Surface preparation will affect the behaviour of the wash: a glossy finish will concentrate the wash into recessed lines, nooks and crannies, whereas a flat surface will make the wash behave a lot more like a heavy filter. I prefer a semi-gloss surface preparation, because both of these properties are desirable. Be aware that a matte surface will make a complete cleanup more difficult and require more thinner than if you choose to go with gloss.
Your wash can be applied directly onto the surface with a flat brush; it will naturally concentrate into recesses and will look very realistic once dried. Avoid putting too much paint at once; you may need to clean up and remove paint once in a while. Use a second brush damp (not wet!) with clean thinner to remove the excess. You can also use an old stiff, dampened brush to create patterns in the wash as it dries. This technique is especially useful for stains, or rain streaks, such as in the following example.
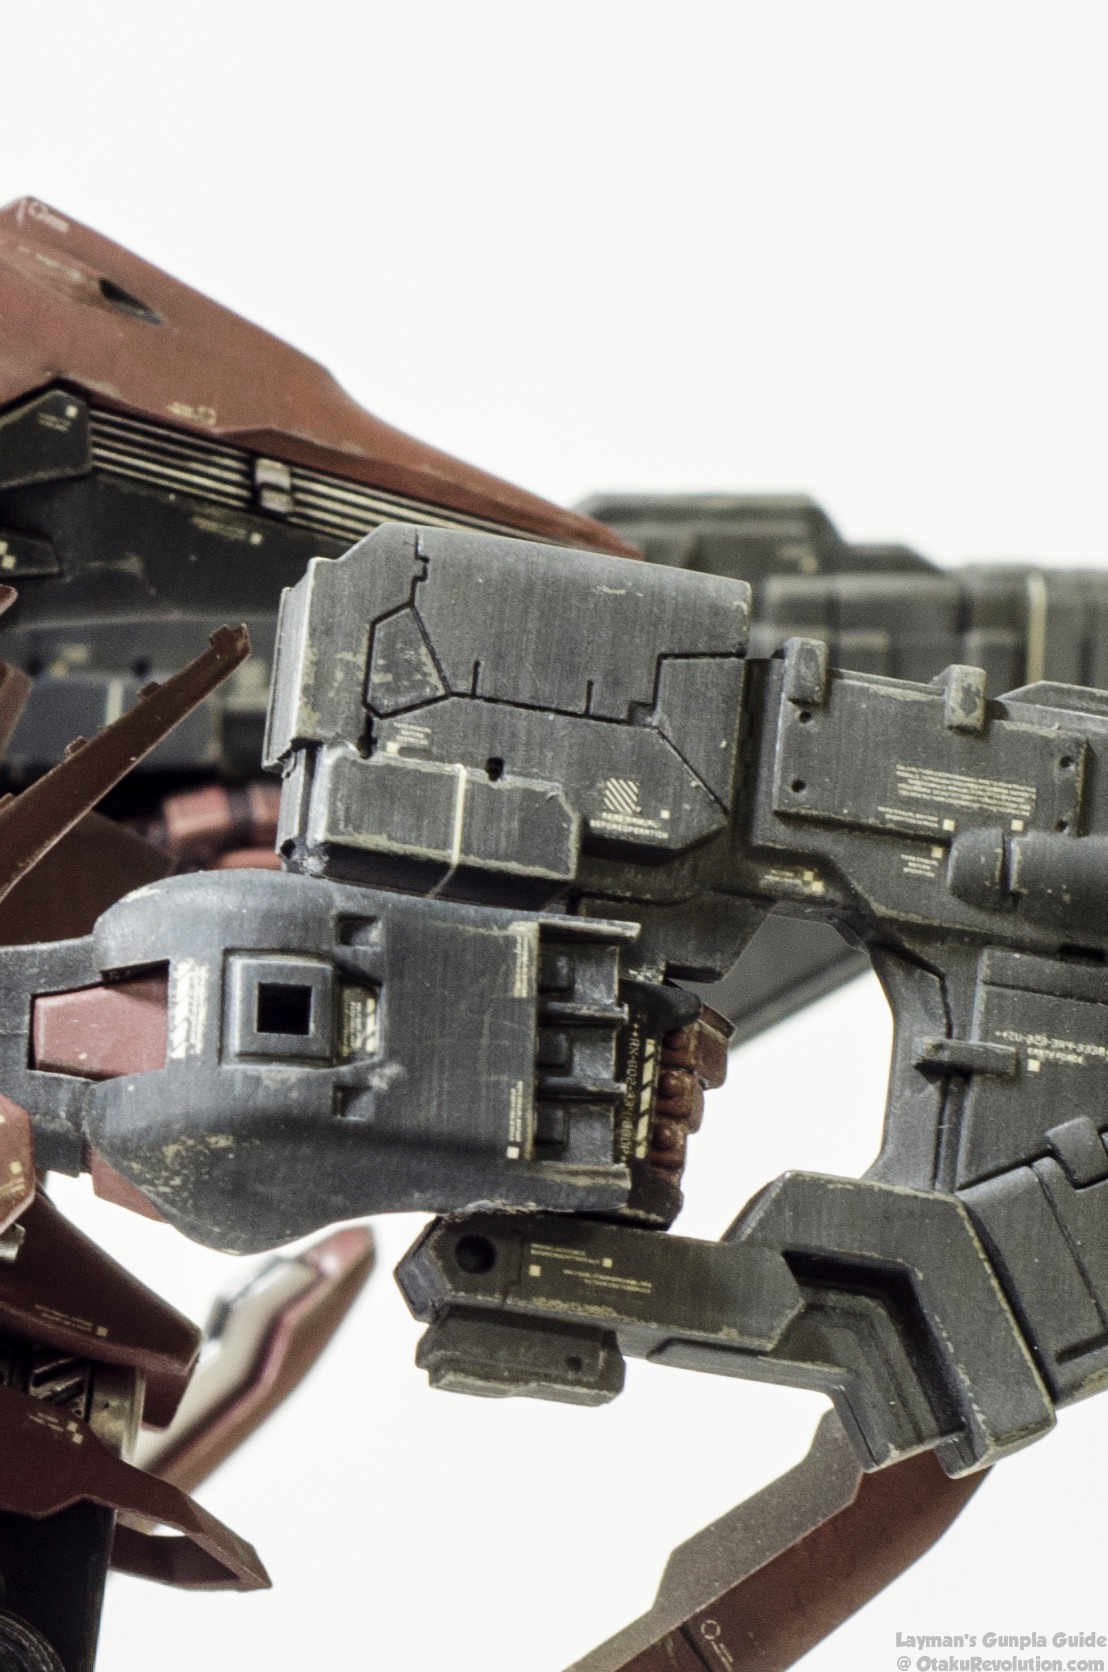
Depending on the concentration of paint, brush geometry and technique, an endless variety of results is achievable. It takes a while to understand the behaviour of oil paint but it is unmatched in realism in the hands of an adept. A major advantage is the fact that with over 24 hours of drying time, corrections and cleanup are possible well after the application. It is possible to completely erase your work if necessary. This allows you to take your time, and fix mistakes long after they happen.
 |
Be aware: there is an unwanted phenomenon that might appear during the drying time. On smooth surfaces, some oil paints coagulate and form spots rather than an even coat. These spots and lines are called “tide marks”. They are due to excessive linseed oil in the paint allowing for pigment mobility even after the thinner has evaporated. Inspect your part for these during the drying time and blend them out with a brush damp with thinner. I’ve noticed this effect is almost non-existent when using 502 Abteilung oil paint. |
Take as much time as possible to let your wash fully cure. 24 hours is the bare minimum, and over 48 hours is what I recommend. This allows you to focus on some other parts of your kit, fix tide marks if they appear, and prevent interference when applying successive washes. Hey, you can even go out or take a break from your hobby! Right?
Discoloration and streaks
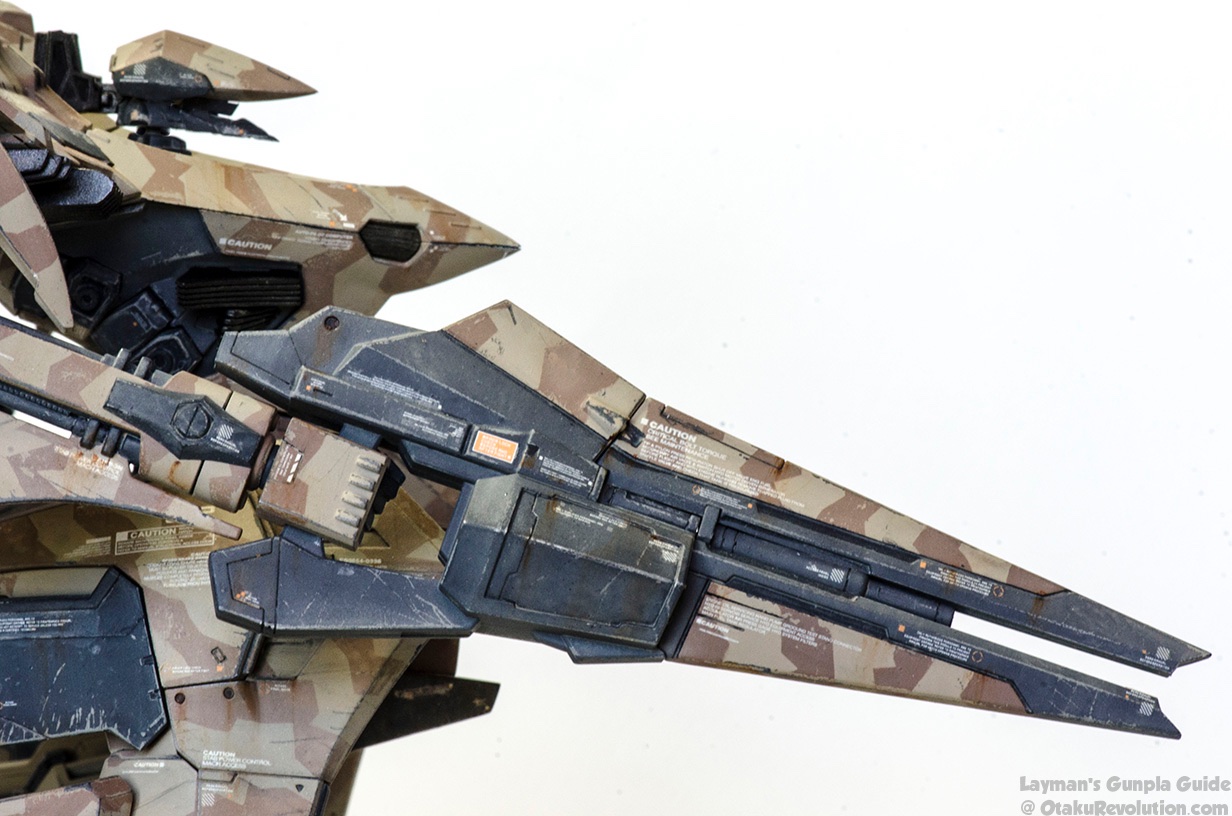
The previous two techniques (filters and washes) were essentially a surface preparation for this step. Although still optional, discolorations and streaks are elements of weathering that really make a model come alive and look “real”. You may need to look at reference pictures of weatherbeaten tanks, trains, or airplanes to mimic the exact behaviour and colors of these effects!
When applied wide and translucent, they serve to simulate random variations in the otherwise monotone color of a paint job, and when applied thin and opaque, they look like real-life streaks of rust, engine oil, grime, or soot. Because this technique involves more liberal amounts of thinner, it is important to ensure that any previous oil weathering steps are fully dried and fully cured. When it doubt, wait another 24 hours. You do not want this step to negatively impact the previous applications of oil paint!
A good way to achieve discoloration involves placing several tiny dots of various colors of de-greased paint onto the kit’s surface, quickly and randomly, using a small brush. Don’t hesitate to use a wide palette of colors, such as blues, greys, yellows, browns and more, at the same time. A wide and flat brush, damp with thinner, is then used to blend these spots into an even coat. This will add a subtle amount of randomness to an otherwise even surface. The key is subtlety – this technique will really add a lot of depth to an otherwise “flat” color.
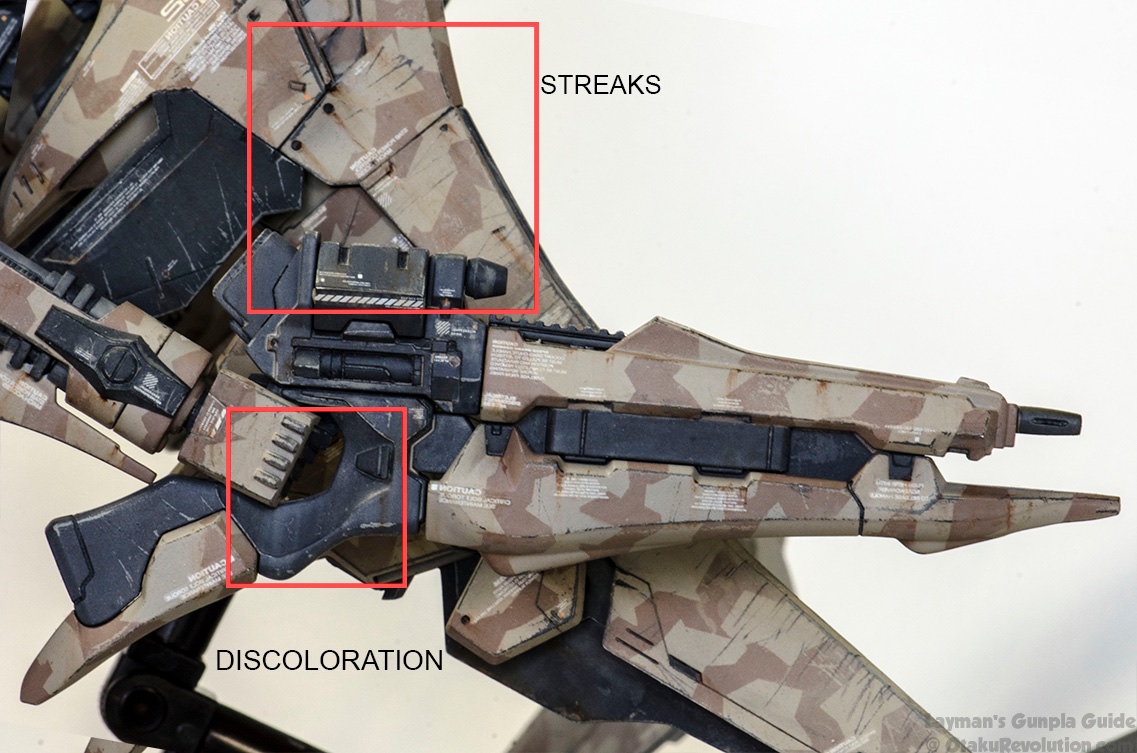
Streaks are done the same way, but with a bit more thinking involved. They are not random. They mimic weathering effects caused by discharge, such as rusting of parts, oil leaks, sooty exhausts, and more. Looking at reference pictures is key! The application technique is similar to discoloration but a bit more refined: instead of using a brush to apply dots of paint, use a needle. Apply tiny, minuscule specks of paint in target areas. Then, using a cotton q-tip dampened in thinner, streak the dots along the direction gravity would pull them. More thinner will make a more diffuse streak, and a dryer q-tip will make them sharper. Change q-tips often to keep the tips clean. You may want to practice the effect in a discreet area to get the hang of it before moving on to the more prominent areas. Once mastered, this effect can really bring a model kit to life!
I tend to keep streaks as a final step because a subsequent application of thinner may blur or smudge the precise and fragile results. Once again, there is a vast quantity of effects that can be obtained using different tools, paints, and application techniques, and the streaks are very easy to scale with accuracy. The key is patience, practice, and adequate research!