
After all that work, cutting, building, priming, painting, lining decals, weathering, and the top coat, you’re all done. Before you stands the latest addition to your collection. There’s only one thing left to do, and that’s show it off. Now you can’t exactly go traveling the country randomly presenting it to passing strangers (well, if you really wanted to…) so you whip out your camera and snap a few shots. While everyone does kits their own way I feel that getting proper photos should be important whether it’s a straight build or plethora of pla plate craftsmanship. Don’t let anyone fool you, a $80 point and shoot will perform just as admirably as a $2000 DSLR when it comes to this task. Here a are a few basic tips to get you started…
Use a Tripod
I often see photos suffering from blur. When shots are blurry it’s hard to see the details and properly appreciate the work being presented. There are two common issues for blurry photos and the first is a result of a slow shutter speed. Aside from adjusting your shutter speed you can alleviate the effect by utilizing a tripod. One can find cheap, regular sized tripods for $20 and mini travel sized ones for less than $10. With your camera attached to one you eliminate any natural body shake. If you don’t want to pick up a tripod try setting your camera on a solid surface, such as a stack of books, or increasing the points of your body supporting the camera. The vibrations recorded while a camera is held at arms length are considerably larger than a camera supported by two elbows on a sturdy surface.
In addition consider using your camera’s timer feature. Most cameras come with one these days. Letting a couple seconds pass between pressing the shutter and the actual exposure can make a big difference. Many tripods and mounts shift a tiny bit but will settle before the picture is taken.
Take a Step Back
Sooo many times do I see a quick snapshot of a kit along with the line “Sorry about the blurry photo, my camera sucks.” The kit is completely out of focus yet the background looks just right. Nine times out of then this is due to someone trying to take a snapshot with the kit way too close to the lens. While every camera and lens is different, all have a minimum focal point. Any closer and it’s not going to be able to properly focus. It’s like holding your hand right in front of your face, you can’t make out the details. Instead, take a step back and use the zoom to adjust what’s filling up the frame.
Also, be aware of where your camera is focusing. Sometimes your camera’s auto settings will get things wrong and try to focus on the background instead of your kit.
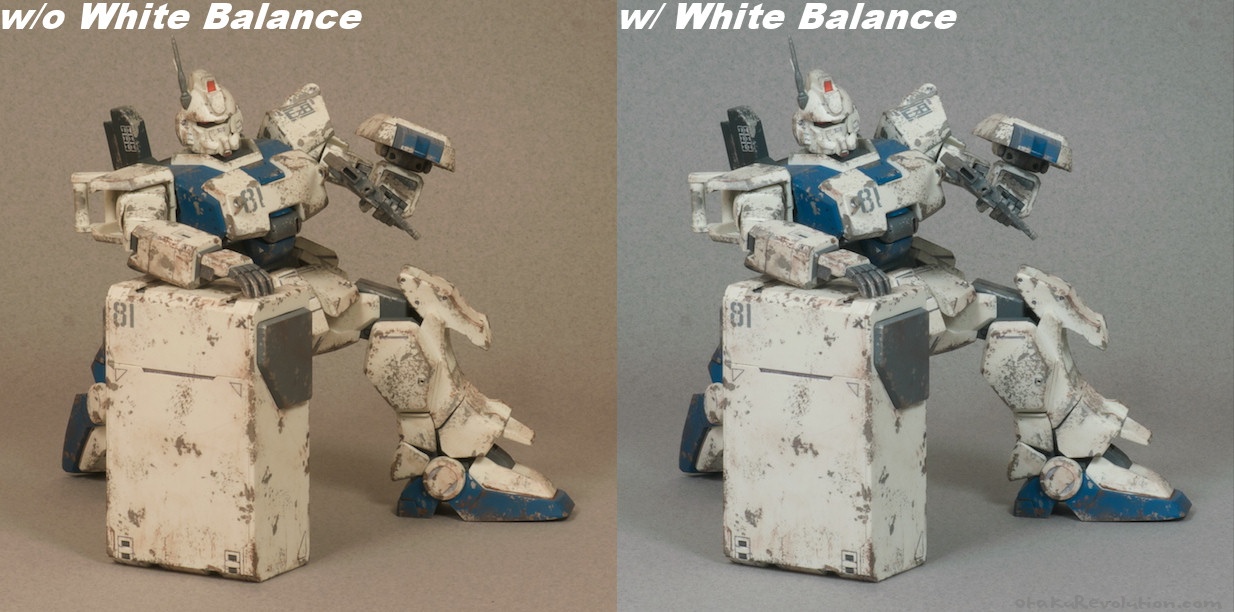
Set your White Balance
It’s very important to set your camera’s white balance. If you’re not sure how check your guide for details but it’s usually quite simple. It essentially involves taking a test image of a white surface so that the camera can set the color balance for the light in the room. In the example below you’ll see that pre light balance my camera picked up the redder hues of my lamps, wall, and various surroundings. On the right is how the same shot looks properly adjusted.
Understanding Aperture & Depth of Focus
Inside your camera’s lens is an aperature. Among other things it has the ability to effect your shot’s depth of field. A larger aperture allows more light to reach the sensor but results in a shallow DoF. Conversely a small aperture will allow more of your kit to be in focus. It’s something best explained visually…
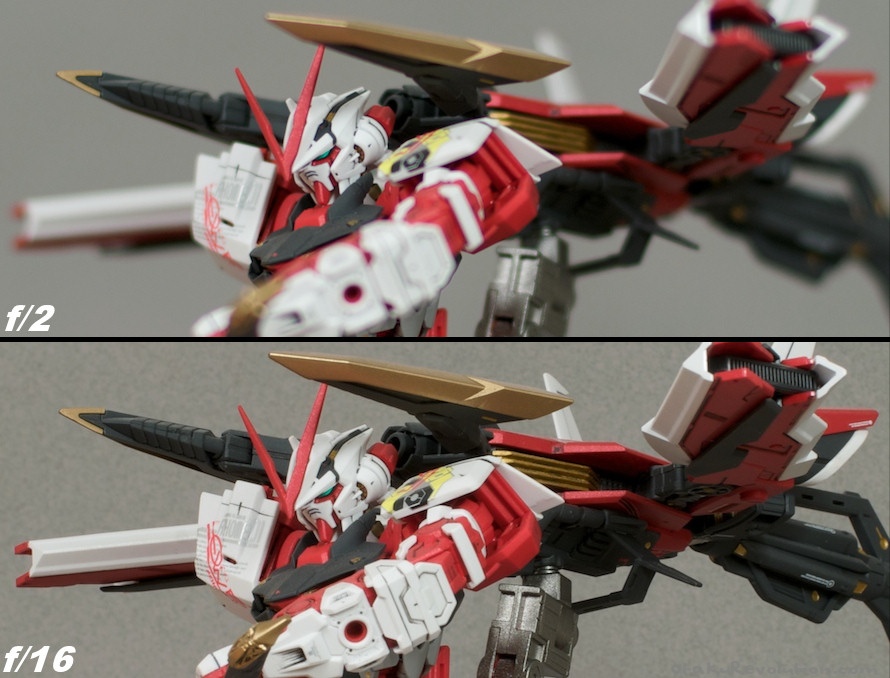
Most cameras allow you the option of adjusting the aperture to various degrees. By doing so one could adjust for a simple shot to highlight a kit and another for a dramatic action pose.
Lighting & Lightboxes
You could have the greatest composition in the word, the most expensive camera imaginable, and still take a horrible shot if you don’t have proper lighting. Many modelers use what’s called a lightbox to achieve just that. While you can purchase a professional kit many prefer to just build their own. It’s rather easy and you can find tons of DIY guides via Google.
My set up isn’t exactly great. It’s a haggered concoction of two lamps, tissue paper, old runners, and duct tape. The positioning is all wrong and I have yet to figure out (read: lazy) a better alternative. I just don’t have the proper amount of space.Take a look…
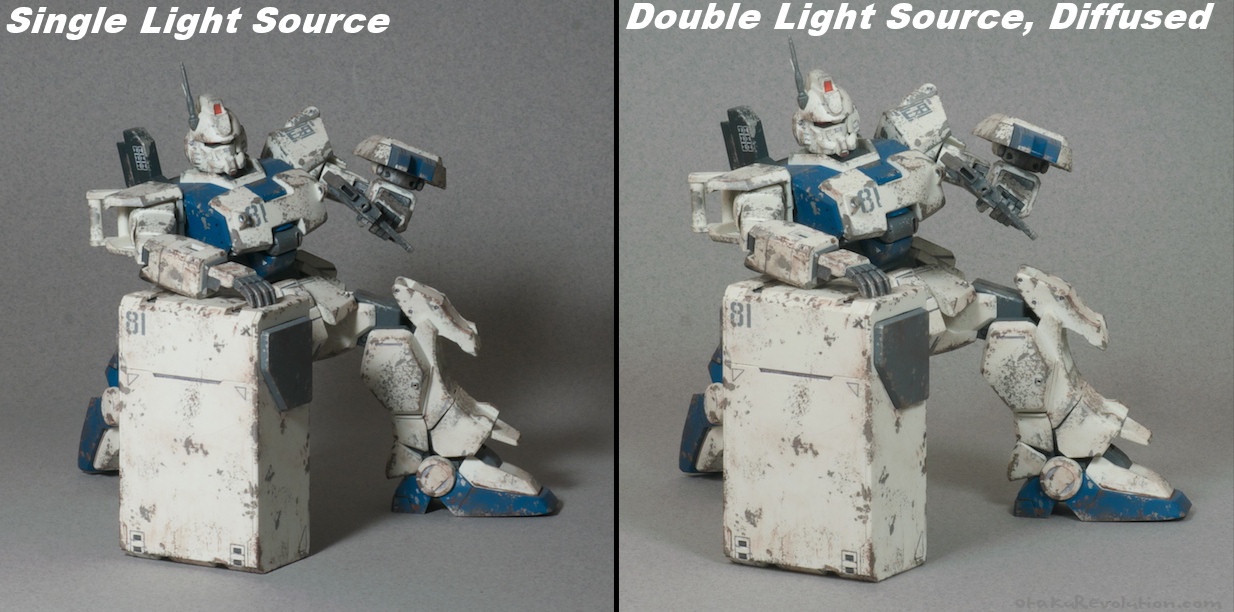
Above is an example comparing a single light source without an diffusing filters and a set up featuring two lights and diffusers. The later, while certainly more formal, isn’t as fun as the first. Try experimenting with the direction and amount of lights. In my Night of the Living Nemo set I experimented with my light source by placing a round lamp at an odd angle from the set, in an attempt to simulate the effect of a full moon. I also added some red lighting in a couple of the shows, from the blow the kit, to eerie effect.
Have Fun!
Photographing your kit shouldn’t be painful. Experiment and have fun. Try to replicate poses and scenes from the show. Take the kit outside and have it fighting it’s way through grass. I’ve seen some fine shots of kits with the setting sun or blue sky as their backdrop.