


Welcome to the pla plate tutorial, where Gunpla starts needing some expert level craftsmanship. Now, don’t get me wrong, pla plating at it’s simplest isn’t too difficult to manage. It’s when you go down the rabbit hole of customization that time, patience, and skill really comes into play. More of that later, for now, the basics.
Pla Plates
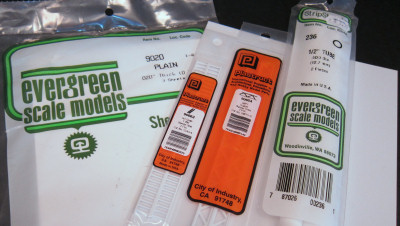
Pla plates, short for plastic plates, is the term generally used by gunpla modelers to refer to what’s commonly known as styrene sheeting. Styrene, a type of plastic, is a preferred material produced for modelers looking to scratch build or customize their projects. It’s fairly common and applies to many hobbies, most commonly model trains, making it quite common in hobby shops. In the United States many shops feature a shelf with plates from Evergreen Scale Models or Plastruct.
Styrene sheets are generally white and range in thickness from 0.3mm to 3.2mm. If you encounter a gray sheet it’s probably ABS plastic. In addition you’re likely to see sheets with textures (such as roof shingles) and stripes/pipes/this and that. When it comes to these unique shapes feel free to let your imagination run wild.
Simple Pla Plating
Pla plating is generally references the practice of attaching styrene sheets to the outside of a kit for added detail and dimension. The process is quite simple, cut out some pieces, affix them to your project, and paint.
Creating & Applying Shapes
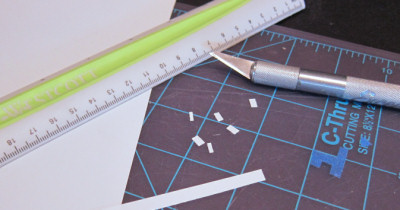
The first step is cutting up your sheeting into small pieces to fit onto your kit. The most common methodology is to cut up standard shapes such as trapezoids or rectangles. To do this all you really need is a sharp hobby knife, a cutting mat to protect your work surface, a ruler, a pencil, and of course, some glue.
Rectangles and squares are the easiest form to make. Design an appropriate dimension and use your ruler to plot the appropriate points on your styrene sheet. Then using the ruler as a stable edge cut along the lines or between the points you plotted. For smaller and common pieces (say 3mm by 1mm plates) cut a larger piece first (in this case 3mm by 10/20/30/40mm). Then using your ruler cut it down into smaller pieces as you need them.
If you’re planning on odd or free form shapes sketch out designs on a piece of paper first. You can then cut them out and place them on the kit to get an idea for the size, scale, and placement without wasting valuable plastic. Once you know what you want you can either trace that piece out onto your styrene sheet or just sketch it again. To make duplicates just trace and cut as much as needed. Note that tracing and cutting generally results in a piece a tad larger than the source. If looking for exact copies make sure to compare and sand/cut as needed.
When it comes to glue I recommend a little bit of plastic weld. With it’s thin nature and brush application it’s easy to apply the just the right amount. Or, rather, it’s perhaps the easiest to apply in the right amount. The downside is, if not applied carefully, it can mess up adjacent parts.
Plastic weld essentially melts the plastic parts together creating a nice tight fit. However a little bit rubbed here or there can create visible defects in the surface.
The key is to apply just the right amount to get the piece on and in place without any seeping out the edges after pressed into place. It’s better to use a little bit and be forced to re-apply or add more later.
For pla plates over curved pieces start by gluing down one end. Once that part has dried apply a bit more to the next section and press & hold in place. Continue until you’ve glued the whole thing. Note that this only works for gradually curving sections. If you have any sort of hard corner you’ll want to cut the piece along that edge, glue separately, then fill and sand as needed.
Keep in mind that styrene can be sanded down just like you do to remove nubs and seemliness. If you want a pla plate to come up and fit flush with an existing edge start by applying a piece that stick out over the edge just a little bit. Once it dries you can cut it down and sand flush. For this to work the plastic needs to be properly glued along that edge otherwise you might pull it back during sanding.
In addition any awkward edges or gaps following pla plate applications can be filled in with putty or other filler and sanded smooth.
To create a more dynamic look layer your pla plates. For thicker pieces you can glue thinner plates together. This is especially useful when creating rounded edges or pieces.
Creating Templates
Another trick you can use is to create your own stencils using other styrene sheets or clear plastic sheeting (which I’ve only seen online retailers). A thrifty builder will be able to use leftovers from hated clamshell packaging.
Check out this nifty tutorial video I found on the YouTubes…
Design Aesthetics
This is the part where I reiterate that what you like and what you want to do with your kit is entirely up to you and what you like. When it comes to pla plating, the shapes you add, how much, how little, how thick they are, and so forth, is all in your hands. Personally, I like to keep things simple and clean. I’ve seen some works out there that have pla plates all over the damn place. While it may be technically well done it clashes with my own personal tastes and I just hate it. Keep in mind that the hobby is what you make of it. Do your own thing and design something you love!
Customization
Here comes the crazy shit. The true artists out there are able to design custom pieces and components from the ground up. It takes one part artist and one part artist to get things right. Aspects I thoroughly lack, but when pla plates are in the right hands, the results are no less than spectacular.
One great example is the builder and artist MatX who’s consistently doing fantastic things with styrene. Just look at this spectacular PG Astray Red Frame! Those looking to take pla plating beyond the level of my tutorial should check out those on his site.