


[flickr-photo:id=13103543165,size=n] (Click to Enlarge)
Panel lining and top coats are simple and great ways to spruce up a kit. Applying decals is another great way. It’s simple, easy and a great way to customize your kit’s appearance. Most Master Grade kits come with a set of stickers and decals (either wet or dry transfer). Perfect Grade kits tend to come with a lot more (because of the size) and most HG do not come with any at all. The good news is there are quite a few third party decal makers out there in addition to basic detailing sets straight from Bandai.
Stickers
Detailing stickers have been released with Gunpla kits for quite some time. They’re cheap to produce and very easy to apply. It’s a sticker, do you really need me to walk you though how to use one?
While they’ve gotten thinner over the years they still stand out quite a bit on a kit. Where a good decal will have edges that contour to the design stickers are generally blocky with a lot of extra white space. This look is enhanced by any sort of top coat. As such I generally suggest that builders avoid them all together. They’re great for beginners but you can get a much cleaner look by investing that time in decal application.
Dry Rub Decals
There are two types of decals out there, the first being dry rub. Dry ryb decals, as the name implies, go on dry with a rub. The high level procedure involves placing your decals on the piece you’d like to apply to and, with careful rubbing, transfer the decal over to the piece. Dry bub decals can be easily identified as they’re usually a sheet of transparent plastic, one side glossy and the other side dull, with the dull side (the side with the decals) protected by a bit of paper to prevent the decals from rubbing off prematurely.
Dry rub decals are very easy to apply but take a bit of skill and patience to get lined up properly. They’re absolutely not forgiving. The trade off is great for folks working on weathered kits. After application they can easily be scraped up a little bit with a toothpick to give it a very realistic worn feel.
Here’s the application procedure in a bit more detail. Before beginning you’ll need a hobby knife, a cutting mat, a dull instrument (such as a dull pencil), and some sotch tape.
Step 1
Use your hobby knife to carefully cut out the decal you want to apply. Most dry rub decals come with some sort of backing sheet that helps prevent the decal from prematurely rubbing off. Make sure to keep this in place when cutting.
Step 2
Take a bit of scotch tape and place it over the glossy side of the decal and use it to carefully tape the decal into location on the model piece. I like to tape off the decal on both ends so I can lift one side up to check my rubbing progress later without messing up the decal’s position.
It’s very important that you do not press the decal against the piece until you have things lined up or the decal may start to transfer before you’re ready. If that begins to happen there’s no turning back. Line up whatever is still on the the sheet with what’s been applied and proceed to step 3.
Step 3
With a dull instrument (dull pencil, fingernail, popsicle stick, etc.) apply pressure and rub the decal. This will press it onto the model. Usually, from the outside, the decal will appear duller as it separates from the decal sheet. Be careful not to move the sheet around as you apply or you might cause the decal to break, resulting in cracks or gaps in the design.
Step 4
After you think the decal has been fully applied, slowly lift up the tape from one end, keeping the other end attached. If you notice any parts missing, lay the decal down again and re-rub. By not fully removing the decal and tape you have a better chance of properly lining the decal up if there’s an issue.
After you’ve applied the decals don’t forget a top coat. While stronger than water slide decals they’re still susceptible to scratches.
Water Slide Decals
Water slide decals are the most prevalent, are fairly easy to apply, and look fantastic. Water slide decals require more effort than stickers or dry rub decals and there’s a bit of a skill curve. Applying them to a kit is a fairly straight forward process but it takes a bit patience to prevent something from damaging the decal. For example, water slide decals provide a lot more leeway when it comes to positioning them just right. Unfortunately the larger the decal the more likely it will tear if you fuss with it too much.
There are several sites where you can create your own decals or buy pre-designed sets, a favorite of mine being Samuel Decal. They’re out of Hong Kong, have a great selection, and ship very quickly to the US.
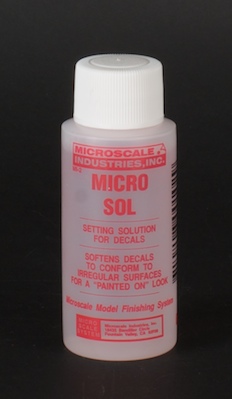
Water slide decals work best when applied on a glossy surface. Dull surfaces will allow lots of little air bubbles underneath giving the clear parts a silvery appearance. Before beginning you will need some tweezers, a shallow dish of water, paper towels, and if you can, Micro Sol or similar along with a small paint brush.
Step 1
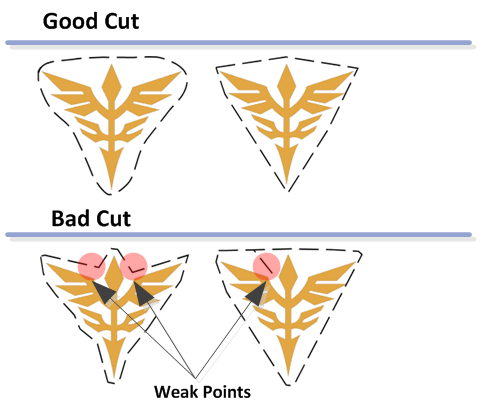
Using your hobby knife and cutting mat carefully cut out the decal you’re going to apply. Modern decal makers such as Bandai are starting to use pre-cut decals. This means that the area of the decal is predefined and you do not need to worry about excess white space. If you’re using an older decal sheet make sure to cut as close to the decal as possible. Cutting out that white space will help make the decal look painted on once the process is complete. Be careful to cut at angles or curves around the decal, never cut an inward angle. A simple cut in will create a weak point for the decal to rip.
Step 2
Place the decal in a bit of water and let sit for 10-20 seconds. The length of time will depend on the decal brand and size. The decal needs to fully saturate before it will slide off the backing.
Meanwhile make sure the surface you’re going to apply the decal is clean. You don’t want any dust or unwanted markings underneath the decal. An optional step here is to use a bit of Testors’ Decal Set, Micro Set, or similar product. I’m pretty sure that they’re all basically watered down vinegar. Either way, they’re meant to clean up the spot you’re going to apply the decal.
Step 3
With a pair of tweezers pull the decal out of the water. Remove any extra water pooled on the decal by brushing it gently against the dish. Be careful to have a good, secure grip, or the decal might slide off on the side of the dish. If you’ve left the decal in the water for too long it may separate from the backing and float free. If either of these happen carefully use your tweezers to remove it from the water and put it on the kit directly or on your finger first.
Step 4
Time to apply the decal. When applying the decal I like to hold it just off from where I want. Then, with a thumb on the decal, I slowly slide it off the backing a little bit. Once it’s off (keeping my thumb on the decal) I can let go with the tweezers, grab the exposed backing, and slowly pull it away, letting the decal fall upon the surface. If the decal doesn’t slide smoothly off the backing, you did not soak it long enough. For small decals, I like to put it down on my thumb, pull the backing off, then press my thumb (w/ decal) against where I want it to go. Generally it will stick with the piece without issue. Trying to do this with large pieces will create wrinkling, folding over of the decal, or worse, tearing.
Step 5
Now for the delicate task of getting the decal in place. Using your tweezers carefully push and pull the decal into place. It’s easy to break or wrinkle larger decals. With experience you’ll start to get a feel for how they move.
If you have a lot of water on the decal dab it just a little with a paper towel. Too much water means that it will keep sliding around and to little means you won’t be able to move it at all. Once you have it where you want it carefully remove any leftover water with your paper towel by adding and pressing the piece against the kit. This will help remove any pesky air bubbles.
If you’ve dried out the decal too much you can add a drop or two of water on top, let it seep in underneath, and should be able to freely move it again.
 |
Caution: If you’re working on a piece that will have multiple decals let each one dry before applying another. Right after you apply a decal they can still be removed and will easily stick to your work surface for fingers. By letting each one dry you can help prevent ones you’ve already applied from getting messed up. Even when adding additional decals to a piece with dried decals, be careful where you grasp the piece. Until you top coat decals can still be ruined accidentally. |
Step 7
Click to Enlarge
Once the decal is in a place you’re comfortable with it’s time to apply some MicroSol. For best results I’ll let the decal dry out a bit so when I apply the Micro Sol the decal doesn’t lift back up.
Micro Sol, and other products like it such as Mr Decal Setter, are magical little solutions that help form fuse the decal to the paint or plastic giving a much cleaner, painted on look. Using your paint brush (make sure it’s clean!) dab a bit of the solution on your decal and let it sit. During this period the decal will become very fragile and can easily be ruined. It may also take on a wrinkly appearance until it is fully dry.
Step 8
Once the first application of decal setter solution has fully dried I like to go back and apply a second. This gives me a chance to fix any air bubbles or work the decal into panel lines. If there are any bubbles under the decal they should be obvious after applying another dab of solution. With the solution in place carefully poke a hole or two into that bubble with a hobby knife. Be careful only to poke downward, never moving across the decal, or you might rip out a piece.
If the decal rests over any detail lines I carefully cut along that line with a hobby knife before applying that second application of solution. With the decal cut along that line the solution should work it’s way in and help form the decal against the lines.
Step 9
Once the decal has been dried completely it’s time to apply some top coat to help protect it.
| Applying decals to your project may seem like a daunting task at first. Fear not, the learning curve isn’t that difficult and with a little practice you’ll be so good at adding finishing touches that even Hajime Katoki will be jealous! |  |