


Welcome to the construction guide! The goal here is to review some of the basics of taking transforming that box of plastic runners into a proper Gundam kit. Beginners who have picked up their first kit have probably opened up the box, looked at the runners, than the Japanese instructions. How do you feel? Excited, maybe have a sense of tribulation? Well worry not!
Despite the number of small parts and the Japanese instructions putting together a kit perhaps the easiest part of the hobby.
Basic Terminology
Before we begin it's important that you familiarize yourself with some of the common terminology. Those plastic things with all the pieces attached? Those are called runners. The parts of the runner which connect directly to the kit's pieces are called sprues. When you cut a piece from the runner and sprue there will likely be a little piece of plastic left sticking out of the piece itself, that is called a nub.
Here's a more extensive list of the hobby's terminology.
Getting to know the Construction Manual
A lot of people on their first kit might open up the manual and be overwhelmed by the amount of Japanese, and their inability to read kanji/rōmaji. Thanks to the efforts of Bandai to put together well thought out and picture based instructions the language barrier wont be an issue. Hell, I go as far as to proclaim that Bandai's instruction manuals are a pinnacle of technical documentation. And that the evolution of that documentation is is thesis worthy. But I digress..
Before starting take sometime to browse through the documentation that came with your kit. HG/MG models usually come with one booklet, while some PG kits can have up to three. Flip through to familiarize yourself with the process. Most manuals follow the same steps, build individual components first (arms, legs, torso, head, etc.) and final assembly. Additional details such as transformation procedures or weapon outfitting follow.
Pay close attention to details the manual provides. Some steps may be accompanied by Japanese text but often include simple picture explanations. I've encountered a few manuals where a seemingly innocuous step will be next to text blurb. Sometimes these boxes just have information on various design options (such as use another piece to get a different look) or assembly pointers. In event of the latter the diagram should be enough, just take your time. 95% of the time parts go together smoothly, and issues tend to be with how the builder is putting them together. If you run into issues reach out to another builder. You don't want to force anything and cause damage.
Eventually working your way through a Gunpla manual will be second nature and you'll start to forgot the effort Bandai graciously put into it.
Tips on Interpreting the Manual
Bandai's manuals use common identifiers to signify some of the more important concerns or steps. Here are some key notations...
Watch Where You Cut

Sometimes pieces are attached to a runner in such a way that the line between the spure and piece can be ambiguous. Notes like this let you know where you should cut so you don't take too much off.
Snapping Order
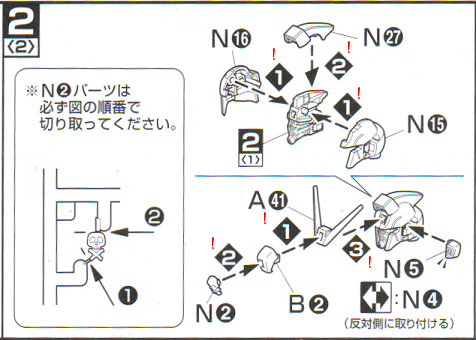
Note the red !s I've placed in the above picture, that's the snapping order for a particular piece. Often pieces need to be placed together in a specific order because they overlap. If you don't follow the order you may find yourself having trouble assembling the piece or having to backtrack and disassemble.
Piece Orientation & Square Symbols

Bandai's guides like to use little hash marks to draw your attention to piece orientation. Failing to note these can cause frustration from parts not going in correctly to limiting articulation. Unfortunately not all guides are clear on just how a piece should be placed. In these instances it becomes a matter of trial and error.
Did you note the odd white and black arrow icon? Bandai used common icons like this throughout their guides to indicate specific events. Some are fairly obvious, others I still don't understand. Luckily I have an awesome, multilingual, reference...
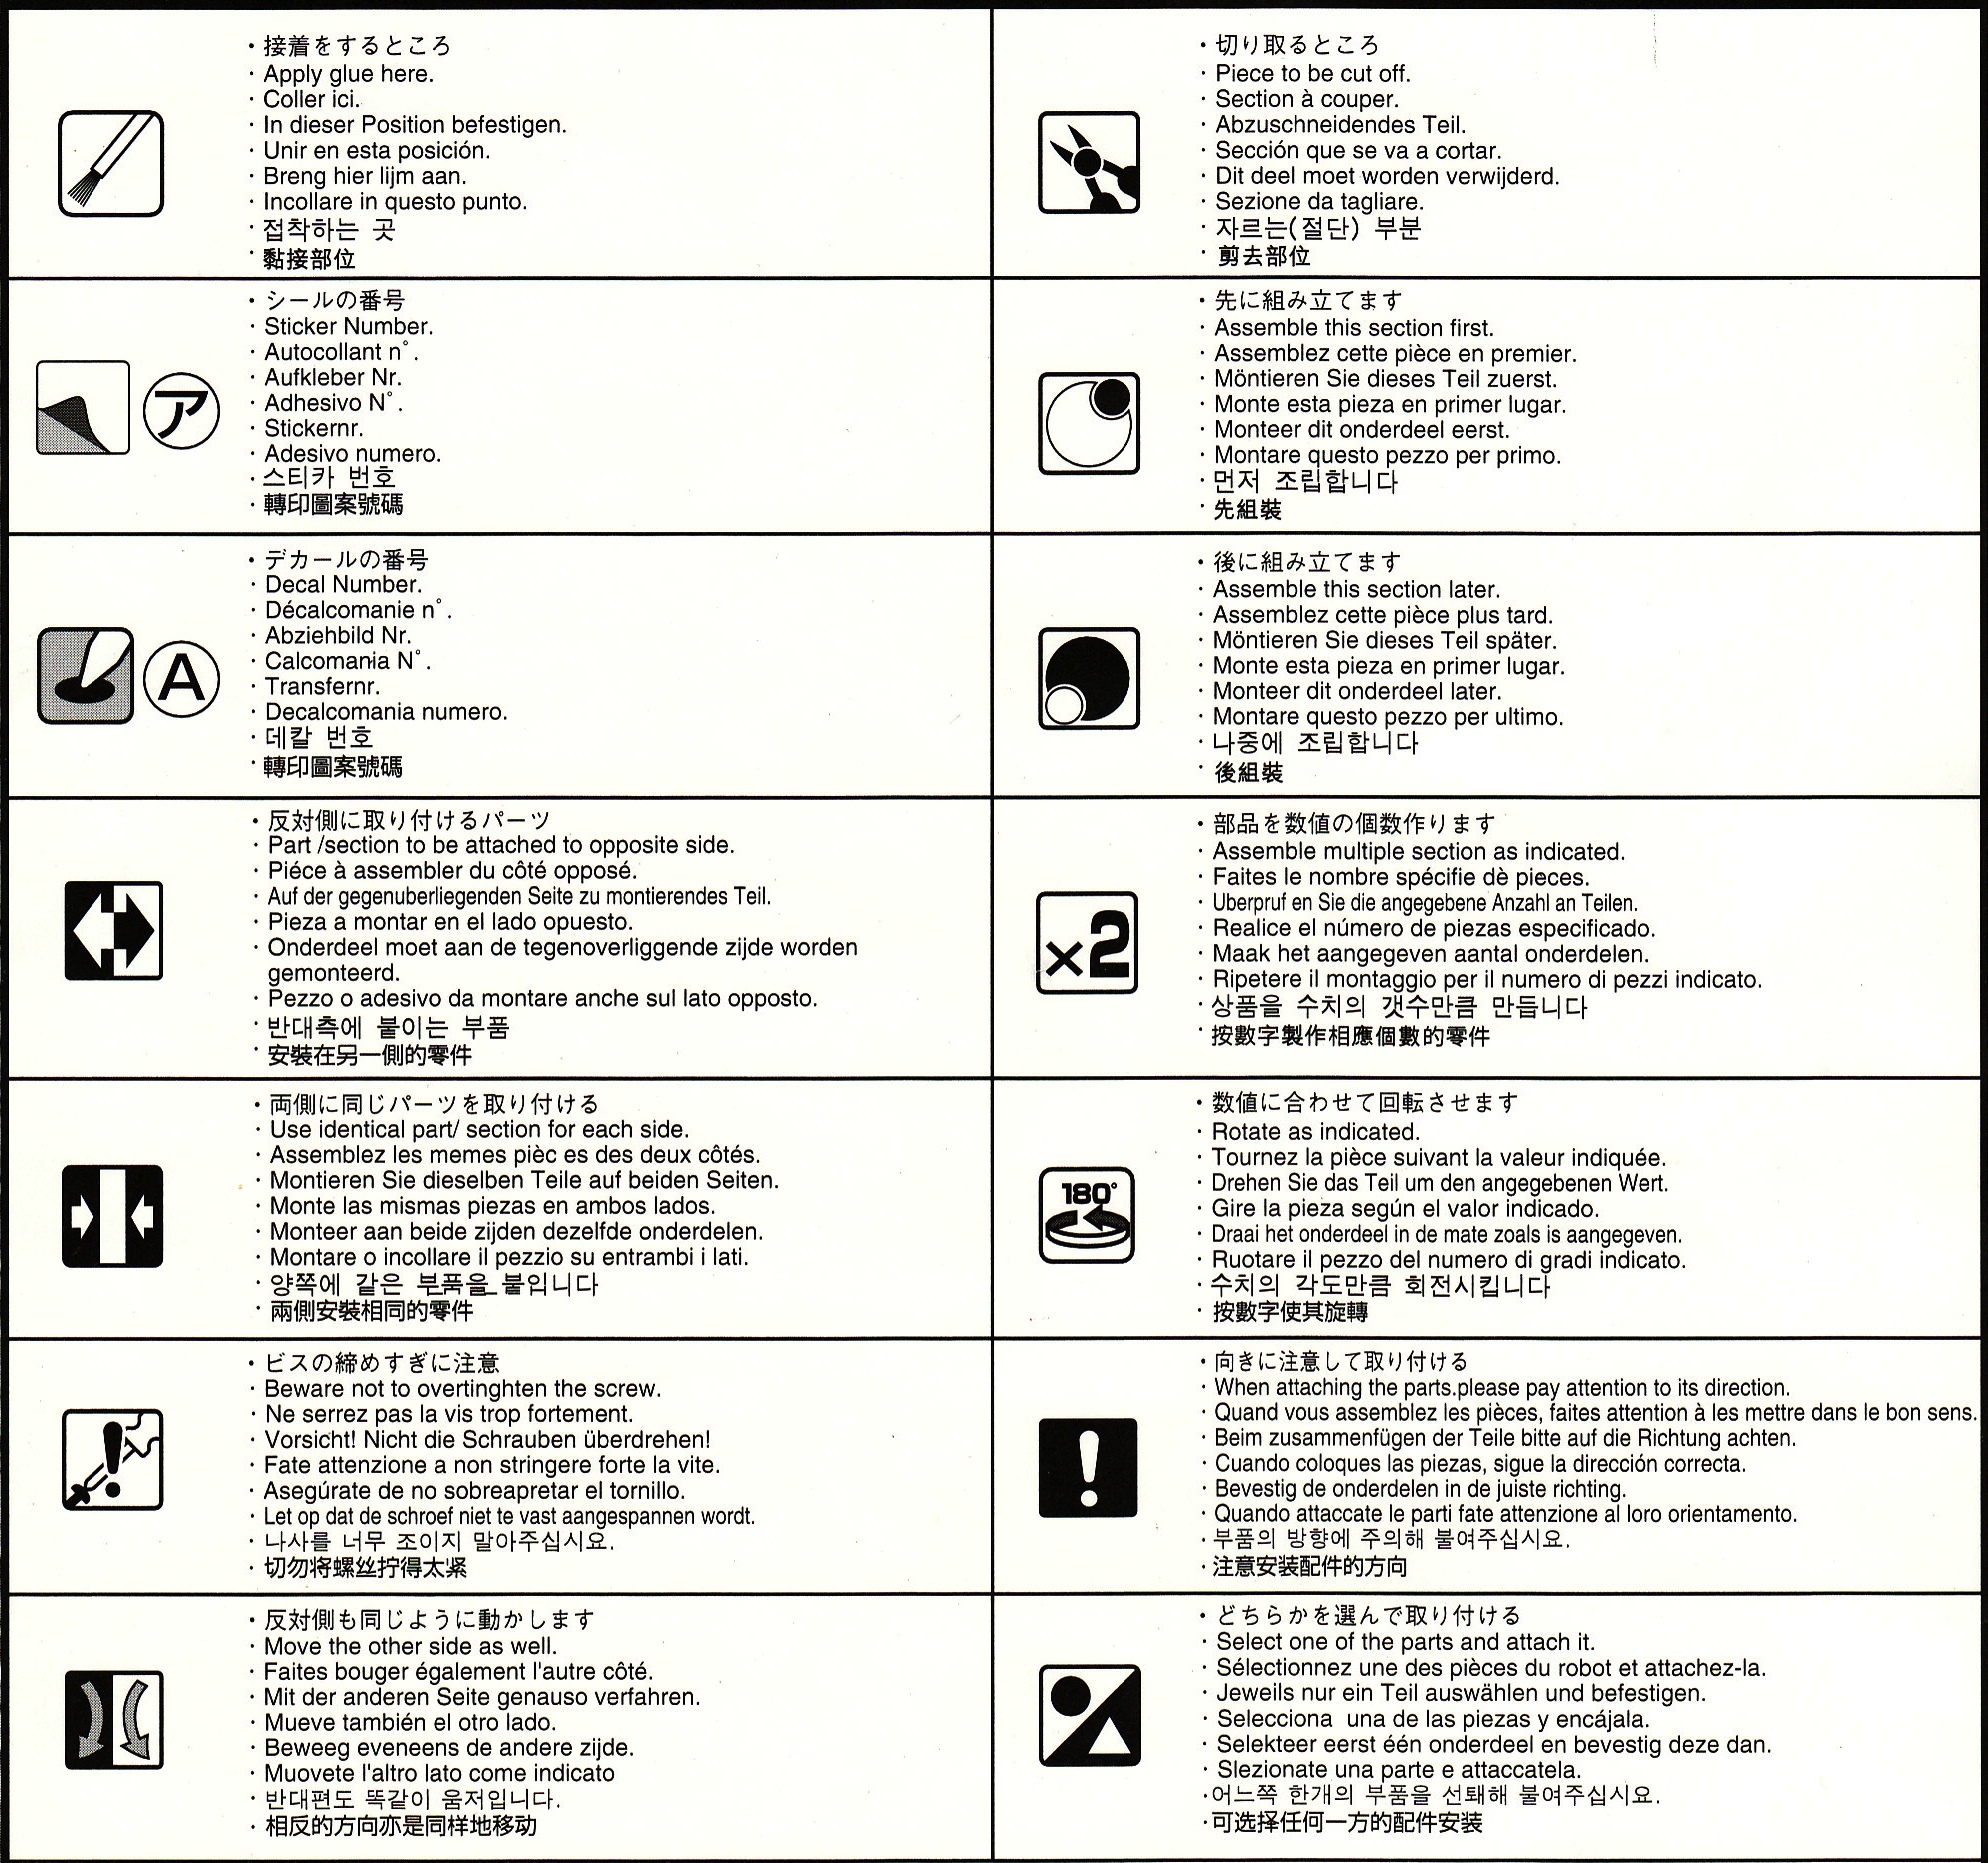
(Click to Enlarge)
Construction
Now, this is the simple part! Basically all you have to do is follow the instructions and you'll have an assembled kit in no time! Okay, maybe I'm making it seem super easy, but it really is.
When building a kit just work step by step through the guide. Advanced builders may be multitask or jump around but it's not recommended for beginners or kits you're unfamiliar with. It's easy to miss a step or piece. Disassembly to insert a forgotten part can be time consuming and potentially damaging to your model. Patience upfront always pays off.
If you haven't already remove all of the runners from their plastic bags and lay them out. Keep an eye out for any screw packets (a relic of older kits), small runners, or stickers/decals. Runners are labeled with English letters, some may say PS which are your pollycap joints. On larger kits there may be A1/A2 or WC/WD runners as they run out of letter or have duplicates. Often you'll have to runners that are the same, or have minor differences, such as when limbs share the same internal frame. When prepping for a build some folks like to say them out alphabetically to make finding runners easily. Often times only a few runners will be needed for any particular part so you shouldn't be hopping through all of them all the time.
Each piece has a corresponding number. If a piece is interchangeable, say it can be used on either the right or left leg, duplicates may exist on the same runner or on matching runners. If a piece is not interchangeable its number will unique. Together, the runner letter and piece number indicate a specific piece reference in the guide. I 34, A 6, B 3, etc.
Manuals tend to have a section where they list all the runners and identify the numbered pieces on them. This is often helpful should you need to find a piece or runner. In this section you may also see a piece with a black X above it. This indicates that the piece is not used in this kit. Sometimes Bandai reuses runners between kits but not always the same pieces.
Before you start cutting and assembling, make sure you have all the appropriate tools at hand. For more info see my list of building equipment for more information.
 |
Protip: Don’t throw away any of the plastic bags the runners come in until after you’ve finished the kit. You never know when a piece might get dislodged during shipping and be floating around the bag somewhere. Even if you check the bags, better safe than sorry. |
Removing Pieces from the Runners
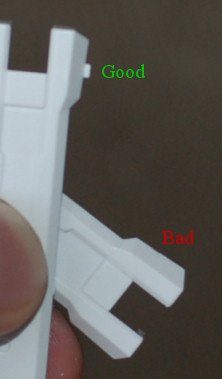
When cutting the pieces from the runners it's important to make two cuts, one to remove the piece from the spur and another to remove the remaining nub from the piece. This helps protect the piece from damage.
Your first cut should be anywhere on the spur as long as it is not flush with the piece, nippers work best for this. The second cut can be a flush cut either with nippers or a hobby knife. If you're using God Hand or other premium nippers, use them for the flush cut only. Here's how a piece should look after a first cut,
When you cut plastic you're essentially tearing it apart, just with a bit more fineness. Plastic is made up of long fibers and compressing or pulling them via cutting can cause them to flex and break. This flexing and breaking can leave little holes on the piece or white stress marks. By making two cuts you help alleviate some of the pressure on the plastic and minimize the damage. It's not perfect always going to be perfect. Certain colours of plastic, such as the classic blue and red, tend to show more evident stress marks. That's just the nature of the material. At the very least adding a quick extra step can help minimize the impact and improve the look.
Sanding
Sanding down nub marks is perhaps the most time consuming part of a build, and in my opinion the most annoying. It’s not difficult most of the time. But when you consider that every piece has on average 3 nub marks that need to be sanded down it adds up.
Even the flushest of nipper cuts will leave just a little bit of plastic behind. Sanding a part after that flush cut will smooth down the piece like there was never anything there. At its simplest take your sanding tool of choice to the piece and move it back and forth over the nub mark. Ridged, flat tools work great for straight edges. For curved edges either work the same tool in a rounded motion or use a softer sander like a sanding sponge that will contour to the piece. You might also have to pull out smaller tools for nub marks that are in hard to reach places.
There are different standing tools, and what to use generally varies between personal preference and what kind of part is being worked on. For example, I have been using fine grained metal rasps for almost two decades. It’s large size makes it easy to hold and, being metal, it lasts forever. I’ve even gotten to the point where I can effectively sand round parts with it. Using something other than a fine grain will leave striations in the plastic so if you’re sure about the one you have do some testing first.
See the general equipment section for more on my sanding tools of choice.
Whatever tool you use, make sure to watch for plastic buildup or surface deterioration. Knock or brush the plastic dust off, I usually just wipe or knock it against my jeans. When your sander loses its grit then it’s time to get a new one. Note that flexible sanding surfaces, like paper or sponges, don’t always retain consistent surface contact. You can ease things up by moving the piece in a circular motion instead of back and forth
Some folks will start with coarse grit sanding sticks and then work their way up to a finer grit one for a nice smooth. I think that tends to be a bit overkill, especially if you’re going to be painting or one section of the piece now has a different finish than the rest. When it is important to take these extra steps is when working with clear plastic. This is where glass files are worth the investment. For the extra gloss I also come in with Gunprimer’s Balancer sticks, essentially super fine grit buffing sticks, which can leave a part shinier than they started off.
Some of the more difficult sanding exercises are when small parts are under-gated. This is when a small file, or cut down piece of sanding sponge, comes into play.
Lastly, we need to revisit nub marks as mentioned earlier. Depending on the plastic, and the stress of the cut, the stress marks might be just at the top level, or go deeper into the piece. Resist the urge to keep sanding, and sanding, until the mark is gone. It’s easy to go overboard and have one piece uneven with another due to aggressive plastic removal.
If you’re really trying to mitigate nub marks, make your first cut then sand the entire of the nub away. No flush cut. It’s pretty overkill but it can make quite the difference on clear parts.
Assembly
So you've removed the pieces from the runner, sanded down the nubs, now for the easy part! Just follow the guide step by step and before you know it you'll have a complete kit.
A couple of quick tips...
- Don't force anything. For the most part Bandai's kits to together smoothly and without too much effort. If you feel things aren't working out like they should reevaluate the instructions and/or ask a Gunpla community. Yes, sometimes you have to get the pliers out, but better to be 100% sure than risk breaking a kit.
- Don't rush things. Rushing through things is a great way to miss a step or do something backward. Going back and redoing things can be a pain. Measure twice, cut once, but with model kits.
- It's okay to build limbs or weapons out of order. Sometimes a particular piece may be driving you up the wall and taking a break by working on something else can be beneficial. Some kits I build the weapons first to get that out of the way. Looking at you Full Armor Unicorn.
I find building relaxing so I take my time building kits. It's not a race, and if you've got a place you can leave projects between sessions, get up, walk around, do other things if you're feeling stressed. And hey, maybe building kits isn't for you. That's okay. It's something that appeals to the side of my brain that would have been a carpenter in another life.
After Build Cleanup
You’ve built your kit, posed it, and now it’s sitting pretty on your shelf. What to do with the leftovers? Many kits come with extra parts these days, or weapons/options you’ve chosen not to use. You could put ‘em back in the box and tuck the box away, which is a good idea for beginners.
Once you start building lots of kits the boxes and parts start to add up quickly. To save space I break down the boxes, and store them for reasons only Tomino knows why. You can also find tons of crafty ideas online to make them into wall art of one sort or another.
For the pieces, I cut them from the runner, throw them in a plastic bag, and then label the bag with the kit’s info. Then that bag goes into a box which also has a label detailing what kits are inside. It’s a lot easier to go back and find parts to a kit when everything is separated and labeled nicely. A bit of effort up front will be worth it in the future.
There’s also the question of what to do with those instruction manuals. If you’ve only got a few kits then you can box ‘em up with the leftover parts. Or, if you’re a serial builder and collector like myself, grab some three-ring binders and clear page protectors. This makes it super convenient to flip through and find a guide.
As for the runners, I typically send mine to the recycling bin. But there’s a lot of different ways to repurpose them, from using them in dioramas, to using them as the sticks for alligator clip holders.
| Congratulations on your new kit! Construction is a lot of fun, especially if you spent your childhood nose deep in Legos. Many people are happy to reach this stage and leave their kit be. I encourage people to take things a little further by taking care of those detail lines and giving the guy a good top coat. You'll find the pay off immense. Don't forget to poke around the rest of the guide for more tutorials on how to make your kit unique. |  |


