


This is an idea I’ve been tinkering with since 2012. New friends to the hobby often ask questions about what order to perform some steps, or whether or not one is even necessary for their project. To help answer I’ve created this little flowchart with some of the most basic steps that goes into an average build. Over all I tried to keep it as simple as possible so it’s easy to understand and applies to the greater number of builders. It’s okay to add or remove steps here and there if it fits your personal style or is necessary for the project you’re working on. I’ve added comments below the chart to highlight some key talking points and related tutorials. Make sure you check them out.
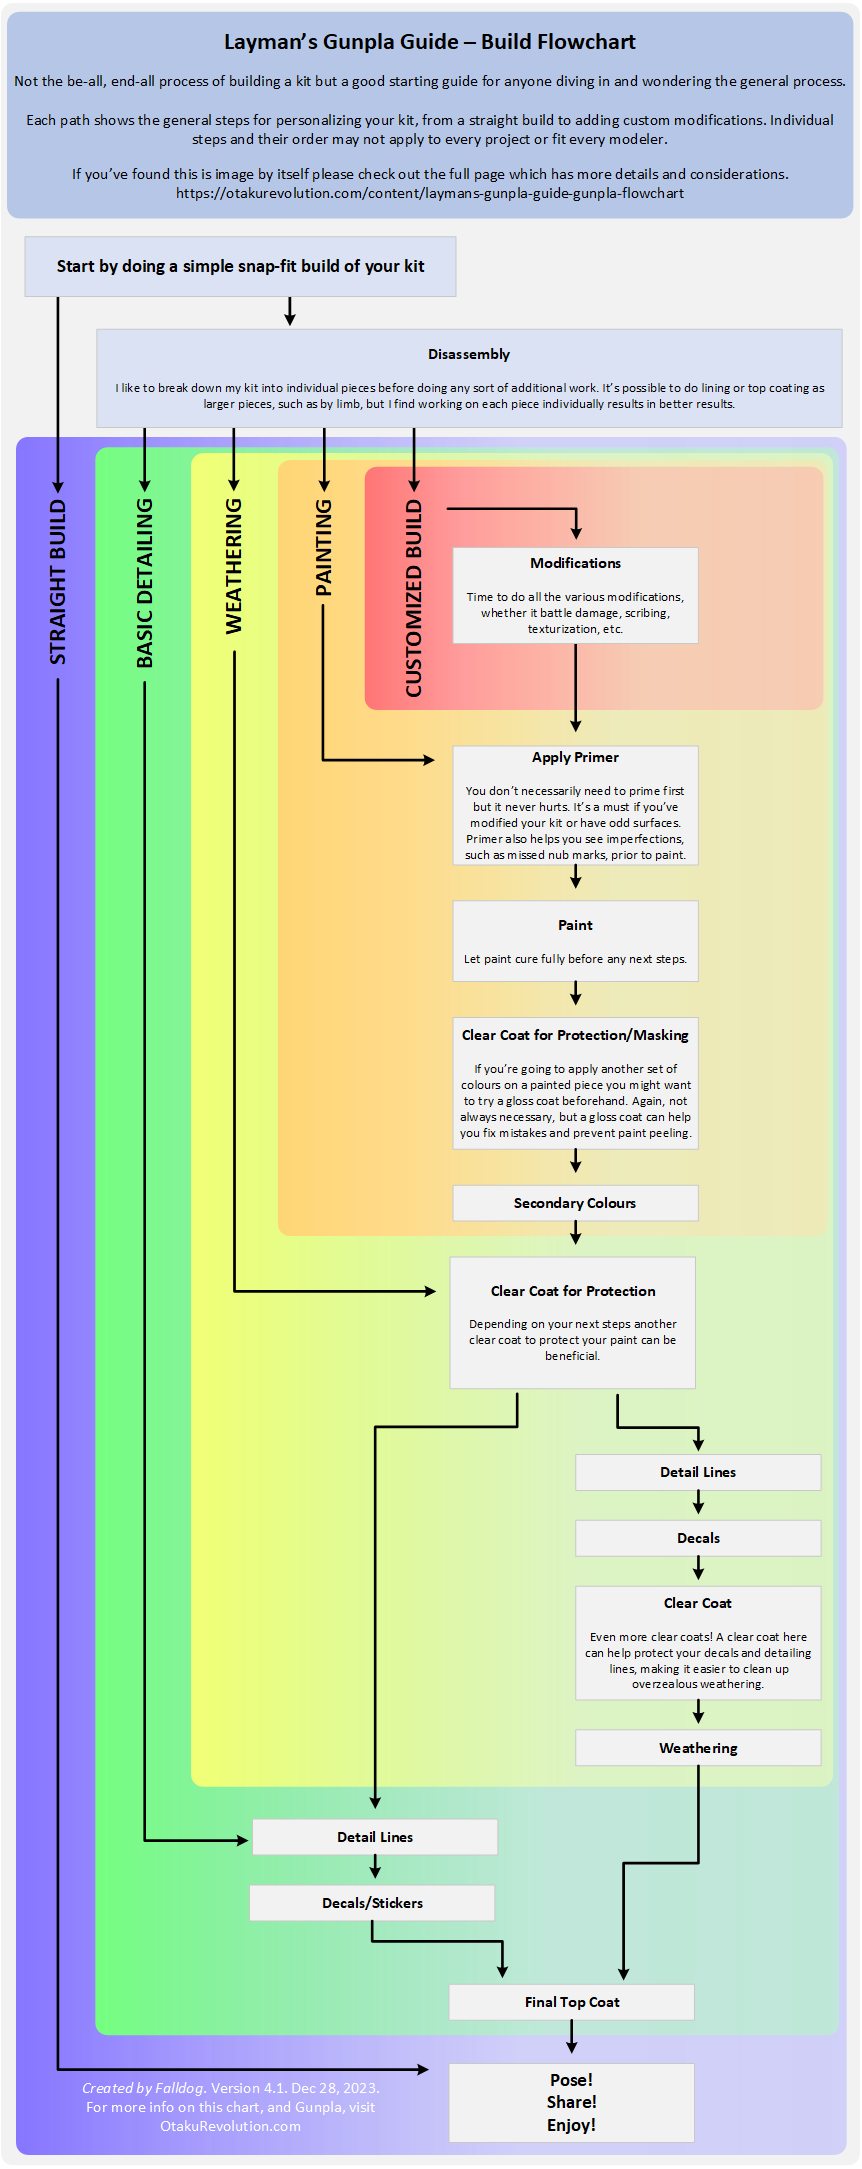
Chart Commentary
The term Snap-Fit Kit is used to describe Gunpla kits which have built and assembled prior to any additional work. It lets the modeler get a better sense for the workings of the kit and make sure everything fits and works appropriately. Don’t use any glue, and if need be, just tape pieces into place. If you have pieces that are tight, or otherwise unlikely to come apart easily, you can skip assembly. Also consider docking pegs a bit by cutting the ends at an angle to make separation easier.
Straight Build kits are essentially straight out of the box. I wanted to show that you don’t have to go through the additional detailing or painting work in order to enjoy your Gunpla.
Basic Detailing represents the most common project out there. After building the kit any detail lines should be highlighted and, if you like, stickers and/or decals applied. Generally I like to apply my decals after lining the kit. If you mess up while lining there’s always the possibility you might mess up the decal as well. Decal solutions often help bind decals into seam lines, which may reduce the impact of the line mark or cause the lining solution to run, soa bit of touch up afterwards may sometimes be required.
The Weathered Kit path is for folks who want to add a bit of grit and grime to their mobile suit. It’s not necessary to have a painted kit in order to apply weathering. Though if you are painting, the weathering step would follow. Stickers aren’t recommended for weathered kits as the process typical makes them stand out. Weathering this sense is purely cosmetic, such as paint chips, rust streaks, dust, etc. Physical weathering such as bullet holes or blown apart limbs would fall under Customized Build.
Painted Kits are the second most common type of completed projects. Whether you want to keep the same colours or add your own twist the process can be fun and easy.
Primer is recommended, but not always necessary. It helps highlight issues such as incomplete sanding. It also helps paint bond to the plastic, but some paints like Tamiya will bond just fine without any primer.
Paint it typically applied in multiple thin layers. See guides on different ways to paint for more details.
Curing is something I only call out in this one section, but it’s something that should be taken into consideration for every step where paint or top coat is being used. Curing is basically letting the paint fully harden, beyond just being dry to the touch. I typically wait over night but some paints might take upwards of 24 hours as all the solvents evaporate out. Typically you’ll want to wait until the paint is fully cured before doing anything on top such as top coats, masking, or decals. The one exception is removing masking tape around painted parts. I’ve found it best to pull masking when the paint is dry to the touch but not fully cored.
Applying clear coats for protection is something that occurs a lot on this chart. How often you do this really depends on what the next layers are. For example, acrylic on top of acrylic is typically fine, but applying enamel over acrylic needs a good clear coat first. Clear coats tend to add more thickness to a part than a layer of paint so you want to take this into consideration.
Secondary Colours in this chart is doing a lot of heavy lifting without much detail. A lot of great builds mix colours on the same piece. Sometimes that’s hand painted, sometimes areas are masked off and paint is sprayed down. 9 times out of 10 you want to start light colours, then add darker colours on top. Though there are times when you might want to reverse that. Let’s say you have a small area on a piece that needs to be lighter. Sometimes it’s just easier to paint that individual area brighter, even if it means a few extra paint steps, instead of trying to mask out that small part itself.
Consider the following example from a build I did…
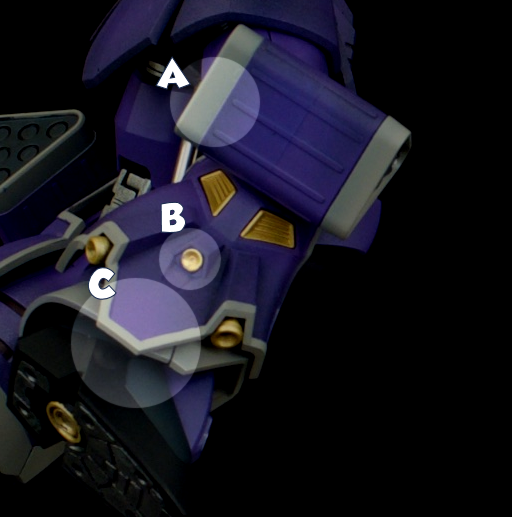
- A – This section of the kit was easier to paint gray first, then mask off the gray and paint the purple
- B – This small thruster detail was easy to paint gold by hand, in part because gold paints tend to have a lot of pigment so covering the darker purple base was easy
- C – This section featured a protruding lip edge. Masking would have been a pain in the ass so I chose the easy way out and just painted the part purple, then painted the gray lip by hand
All this to say the order of operations when putting down colour will depend on various factors. If you’d like some advice please comment below, hit me up on Instagram, or check out the Discord linked at the top of this page.
Customized Builds are when your imagination gets set free. Battle damage, custom weapons, pla plating, etc. Modifications is a catch all for the plethora of various workups you can do here.