


Introduction
Airbrushing can be sound pretty daunting to a lot of folks. It may not be the simplest way to go about painting your kits. Nor the least expensive way to start out. Yet the time and energy spent into learning, using, and maintaining your equipment will no doubt pay off with some of the best paint jobs imaginable.
Starting off with airbrushing requires a bit of an investment; airbrush, compressor, and various little bits and pieces to bring it all together. Setup can run anywhere from $75 all the way to $500 and beyond. Buying the most expensive equipment doesn’t mean you’ll be a master anymore than lower end products will ruin your kit, it’s all in how you use it. Currently I use a Badger Renegade Velocity along with a Badger Airstorm compressor.
For more information on airbrushes and airbrushing equipment please check the Painting Equipment section.
Using spray cans, in addition to being cheaper in the short term, will also shorten the amount of time spent on your project. Unlike prepacked products you’ll have to mix thinner and spend time breaking down and cleaning up after your work is through. The benefit to all this however is impressive. With an airbrush you’ll be able to achieve a much thinner and smoother coat and, through paint mixing, have access to an unlimited pallet.
New comers to the hobby might want to start with spray cans, there’s nothing wrong with that. I’ve used them for years and still will for some projects. Those looking to advance their craft or really want to get into Gunpla should definitely choose this path.
When it comes to painting your Gunpla I’ve found that one can achieve the best finish via airbrushing.
Workspace
Before starting to mix paints and paint it’s important to set up a proper working environment. Airbrushes release a lot of paint particulate into the air during normal operations. Depending on the paint and activity length you could be putting a lot of hazardous materials adrift in your place. Best case is that the area around you gets covered in a fine layer of coloured dust, worst is that potentially toxic materials have made their way into your lungs. Try to paint in a well ventilated area or with the assistance of a paint booth. If things get bad the use of a mask designed to filter small particulate.
Also consider the likely possibility of spilled paint and put down something to protect your workspace such as a drop cloth or butcher paper. For more detailed information regarding prepping your workspace please check out the Paint Space Prep section.
Last but not least, make sure you’re prepared all equipment and cleaning materials prior to painting. Nothing like sitting down to get to work only to find that you’re missing something important.
Prepare Pieces for Paint
If you haven’t already, carefully dissasmeble your kit and sort the pieces by the colour you intend to paint. Unless you’ve put your kit through hell there isn’t a need to wash it like older plastic models.
Take your skewers/toothpicks and alligator clips/putty and attach them to your pieces in a way that won’t prevent any part from getting painted. The alligator clips work best when there’s something on the inside of the piece. Sometimes there isn’t a good surface or it’s too small making poster putty your best bet. Place the pieces in the foam or cardboard piece you’ve prepped making sure that they don’t bump or rub into each other. You’ll be removing a piece at a time, giving it a coat, and returning it. If you have excess material it can be helpful to move pieces between holders as you add coats to keep track of what you’ve painted and what needs a bit more lovin’.
Priming
Priming is an important step for many projects, but not all. I decided to pull information about priming out and give it its own section on the Guide. Take a look and determine whether it’s suited for your project. If so, now’s the time to prime. Look at that, a rhyme! … I apologize for that. Before painting make sure that you’ve achieved a nice, even coat with the primer and that it’s fully cured before painting.
Thinning
Thinning is very important to getting a smooth coat. Different paint types, companies, and thinner producers all have their own recommendations about the right mixture to use. A rule of thumb that a lot like to use is “thin to the consistency of milk.” Unfortunately not all milks are created equal.
I recommend starting with a paint-to-thinner mixture of 75-25% and adjust from there. Sputtering from your airbrush, running paints, or other issues are often related to a poor mixture. In such an instance you just need to adjust by adding more thinner or more paint to effect the mixture. Try to do a little at a time or you’ll find yourself with the right mixture, but way too much paint. Remember that if you use too much thinner your paint will not adhere properly and will be more likely to create drips and pooling.
In some instances you’ll find that different brands of paint/types of paint/even different colours will require their own special treatment. At one point I had two colors of the same kind of paint from the same company. Even though I mixed the same way per the instructions one sprayed great while the other was pretty weak.
Other important notes,
- Make sure to thoroughly stir your paints prior to adding thinner and again prior to application
- Tamiya acrylic paints can often be thinned in their jar by filling up the remaining space with thinner
- Of course, always use the right type of thinner with your paints
Spray on Thin, Light Coats
At last, it’s finally time to go to work. The trick is simple, use your brush to apply multiple thin coats, letting them dry between coats.
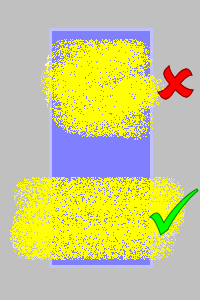
If you’ve ever used a can of spray paint they recommend that you move across the object, never stopping while on the piece. Airbrushing works the same way. By continually moving across the piece and not stopping over it will help prevent uneven coats. Allow my ‘masterful’ artwork to help illustrate my point,
Protective Top Coats
Because of these thin coats, in part dependent on the types of paints used, paint can often scratch or chip easily, especially during kit reconstruction. I highly recommend applying a thin clear coat after painting to protect it from wear. If using a spray can make sure to use a different type (e.g. don’t use lacquer based clear coats on top of a lacquer paint) as they can sometimes mess with the underlying paint. This step is also recommended when applying secondary colours upon previous work.
Touch Ups
It’s likely that during construction you may have scratched some paint off. You could disassemble, repaint, and dry again, but it’s much easier to just fix it while it’s all together. To avoid getting paint on other parts just grab a fine tipped brush and dab it on in small amounts. Try to use the same paint you previously thinned for air brushing to achieve the best outcome. Alternatively you can carefully use a note card as a backdrop & separator to cover up other parts while air brushing. Note cards can also be used for crazy spray effects… if you’re the creative type.